
User Manual


18 Rev. 3
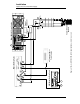
Installation
Power-Up Procedure
cables from the magnet current leads and fastening them together.
1
This will allow rudimentary power supply checks without
energizing the superconducting magnet.
3. Energize the Model 430 Programmer by placing the power switch
in the I (ON) position.
4. When prompted by the Model 430 Programmer, energize the power
supply and press ENTER on the Model 430 Programmer.
Warning
All power supply parameters, both hardware and software, have
been set at the AMI factory. Power supply control, with the exception
of powering
ON and OFF sequencing, is done by way of the AMI
Model 430 Power Supply Programmer. No field adjustments or
reconfiguration of the power supply should be attempted in the field
unless specifically described in this document or recommended in
writing by an AMI Technical Support Representative.
5. Enter a stability setting of 100%. Refer to sections 3.3 on page 25
and 3.7.9 on page 39.
6. Verify the various setup menu values for the system (with the
exception of the stability setting, which is to be temporarily left at
100%). If the power supply system was purchased with an AMI
magnet, AMI has preset the setup menu values for proper
operation. See sections 3.3, 3.5, 3.9 and 3.10 for more discussion of
the setup menu values and their entry into the Model 430
Programmer.
7. Set the Model 430 Programmer to display current (rather than
field). Refer to sections 3.2.1 and 3.7.5.
8. Set the ramp rate to 1 A/sec. Refer to sections 3.3 on page 25 and
3.7.1 on page 33.
9. Set the target current to 10 A. Refer to sections 3.3 on page 25 and
3.6.2 on page 31.
10. If a Persistent Switch is installed, set the PSw P/S Ramp Rate to 10
A/sec. Refer to paragraph 3.10.2.11 on page 56
11. Initiate ramping to the target current by pressing the
RAMP /
PAUSE
key (status indicator changes from P to ).
1. If the system shipped with CamLoc quick-disconnect connectors, they may be quickly dis-
connected from the magnet leads and connected together.