
Installation Instructions

P a g e | 5
3 – Following manufacturer’s instructions, apply panel adhesive to wall, studs or furring strips. Starting in the corner, run a small
bead of adhesive along the studs, furring, or if you are installing on solid wall, apply adhesive in a grid pattern. Do not apply
adhesive beyond area to be covered by panel.
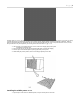
4 – Place panel [3] at installed position and press lightly to spread adhesive to back of paneling
5 – While holding at installed position, drive four nails[4] ¼” to 1/2” into the wall, leaving enough of nail exposed for easy removal
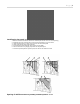
6 - If adhesive instructions suggests this(and most do), pull bottom of paneling away from the wall until it becomes tacky, using
scrap wood at the bottom as a spacer. Once tacky, remove the scrap wood and press paneling firmly into wall, then, using a fabric-
wrapped block of wood against the paneling to protect it, use the hammer to carefully set the paneling against the wall. We
recommend driving nails at 6 to 12” spacing along the top and bottom edges of the paneling, but this is optional.
7 – Countersink any nails with your nail set, and fill any nail holes with a color-matched putty and wipe off any exposed adhesive
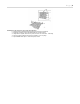
Installing middle panels with adhesive ref32-1
1 – Repeat steps 2 through 7 except for the last panel