
Master Switch User Guide AP9210

21
MasterSwitch 100V – User Guide
21
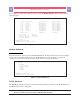
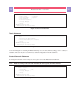
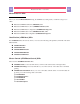
For configuration of the master outlet, select option 2 from the Outlets Manager submenu. The following
submenu appears:
------ Configuration of Master Outlet --------------------------------------
Outlet Device Name Auto Power On Reboot Duration
---------------------------------------------------------------------
1:ON Device 1 With Master Same as Master
2:ON Device 2 With Master Same as Master
3:ON Device 3 With Master Same as Master
4:ON Device 4 With Master Same as Master
5:ON Device 5 With Master Same as Master
6:ON Device 6 With Master Same as Master
7:ON Device 7 With Master Same as Master
8:ON Device 8 With Master Same as Master
Master PDU Immediate 5 Seconds
1- PDU Name : Main PDU
2- Auto Power On : Immediate
3- Reboot Duration : 5 Seconds
4- Accept Changes :
?- Help
<ENTER> Redisplay Menu
<ESC> Return To Previous Menu
Figure 9: Master Configuration Menu
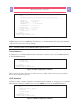
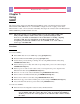
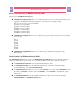
Network Submenu
From the main menu, option 2 activates the Network submenu. From this submenu, the user may configure
and the various networking parameters used by the MasterSwitch, use the ping utility to test network
connections, and set access control parameters. Figure 10 shows the Network submenu.
--- Network --------------------------------------------------------------------
1- TCP/IP
2- Ping Utility
3- Access Control
4- HTTP
5- Telnet
6- SNMP
<ENTER> Redisplay Menu
<ESC> Return To Previous Menu
Figure 10: Network Submenu
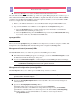
TCP/IP Submenu
The TCP/IP submenu allows the user to set network address parameters and enable or disable BOOTP. Note
that MAC addresses are not changeable.
Note: Ensure that any changes made to network settings are correct. Incorrect settings are
the most common reason for network communications problems!