PROFESSIONAL QUALITY COOKING EQUIPMENT INSTALLATION MANUAL FOR LEGACY built-in electric,gas and hybrid single and double WALL OVENS MODEL NUMBERS: GAS MODELS: AROFG-30, AROSG-30, AROFFG-230, AROSSG-230, AROFSG-230 ELECTRIC MODELS: AROFE-30, AROSE-30, AROFFE-230, AROSSE-230, AROFSE-230 HYBRID MODELS: AROFFHGE-230, AROSSHGE-230, AROFSHGE-230 DESIGN © 2014 American Range All Rights Reserved CLASS FUNCTION 13592 Desmond St., Pacoima, CA 91331 818.897.0808 tel 888.753.9898 toll free www.americanrange.
Installation Manual Residential Wall Ovens Table of Contents Warnings & Important Safety Instructions....................................................................................................................................1-4 Single Wall Oven Dimensions................................................................................................................................................................ 5 Single Wall Oven Cutout Dimensions.................................................
Residential Wall Ovens Installation Manual Installation, Operation and Maintenance Instructions FOR YOUR SAFETY! Do not store or use gasoline or other flammable vapors or liquids in the vicinity of this or any other appliance. FOR YOUR SAFETY WARNING IMPROPER INSTALLATION WARNING! Improper installation, adjustment, alteration, service or maintenance can cause property damage, injury or death.
Installation Manual Residential Wall Ovens IMPORTANT - PLEASE READ AND FOLLOW! • • • • • • Before beginning, please read all the instructions carefully. DO NOT remove permanently affixed labels, warnings, or plates from product. This may void the warranty. All local and national codes and ordinances must be observed, installation must conform with local codes. The Installer must leave these instructions with the consumer who should retain for local inspector’s use and for future reference.
Installation Manual Residential Wall Ovens IMPORTANT - PLEASE READ AND FOLLOW! A ground fault interrupter (GFI) shall be used as required by NFPA-70 (National Electric Code), Federal / State / Local laws or local ordinances. • The required use of a GFI is normally related to the location of a receptacle to any significant sources of water or moisture. • American Range will not warranty any problems resulting from GFI outlets which are not installed properly or do not meet the requirements below.
Installation Manual Residential Wall Ovens IMPORTANT - PLEASE READ AND FOLLOW! ! WARNING Do not use the handle or oven door to lift the oven. Remove pull down door before installation to ensure that it is not used to lift the unit. Make sure pins are inserted into hinges before removing door to prevent injury to hands and / or fingers. ! WARNING The misuse of the oven door(s) (e.g.; stepping, sitting, or leaning on them) can result in hazard or injuries and damage to the product.
Installation Manual Residential Wall Ovens DIMENSIONS - SINGLE WALL OVEN 39 2" 1/ 6- 2 2" -1/ " 1/4 24 28 -7 30" 31-3/8" French Door " 31-1/8" French Door 4" 1/ 5- 4 /16 Pull Down Door / Chef Door 5 13592 Desmond St., Pacoima, CA 91331 818.897.0808 tel 888.753.9898 toll free www.americanrange.
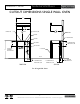
Installation Manual Residential Wall Ovens CUTOUT DIMENSIONS SINGLE WALL OVEN 30" 28 21 " WIDTH OPEN BOTTOM 24 21 " ELECTRIC CORD 31 41 " HEIGHT REAR WALL DEPTH GAS INLET GAS REGULATOR COUPLING 10" FLEX CONDUIT E 36 10" TO CLEAR REGULATOR AND ELECTRIC CORD SHUT-OFF VALVE G ELECTRIC GAS ANYWHERE BELOW THIS LINE 2 x 4 SUPPORT CL FLOOR 521 " 12" TO CLEAR REGULATOR AND ELECTRIC CORD TO CLEAR REGULATOR AND ELECTRIC CORD FRONT VIEW 7" SIDE VIEW For all Single Wall Ovens 6 13592 Desmond St
Installation Manual Residential Wall Ovens CUTOUT DIMENSIONS SINGLE WALL OVEN 28- FOR OVEN SUPPORT, INSTALL 2" x 4" EXTENDING FRONT TO BACK FLUSH WITH THE BOTTOM AND THE SIDE OF THE OPENING. THE SUPPORTING BASE MUST BE WELL SECURED TO THE FLOOR/CABINET AND LEVEL. 1/2 4" " MIN 31- . 1/4 " MIN RE C. 28- " 1/2 . 24 6" x 6" OPENING FOR GAS/ELEC. CONNECTIONS 3/4 2" x 4" SUPPORT " 2" x 4" SUPPORT MIN. 10" E G GAS/ELEC.
Installation Manual Residential Wall Ovens SPECIFICATIONS & ELECTRICAL REQUIREMENTS SINGLE WALL OVEN Description Gas Electric Overall Width 30” 30” Overall Height Overall Depth: To the edge of control panel With French Door open With Chef Door open 31-3/8” 31-3/8” 26-1/2” 39-1/2” 45-1/4” 26-1/2” 39-1/2” 45-1/4” Cutout Width Cutout Height Cutout Depth 28-1/2” 31-1/4” 24-1/2” min 28-1/2” 31-1/4” 24-1/2” min Electrical Requirements 3-wire ground, 120 VAC /60 Hz, 15 AMP Cord supplied.
Installation Manual Residential Wall Ovens DIMENSIONS - DOUBLE WALL OVEN 2" 1/ 9- 3 2" 1/ 6- 2 /2" 28- 1/2 " -1 24 30" 58-5/8" 56-7/8" 4" 1/ 5- 4 Double Wall Oven French Door on the top Pull Down Door / Chef Door on the bottom 9 13592 Desmond St., Pacoima, CA 91331 818.897.0808 tel 888.753.9898 toll free www.americanrange.
Installation Manual Residential Wall Ovens CUTOUT DIMENSIONS DOUBLE WALL OVEN 4" MIN . 57- 28- 1/2 1/2 " " 1/2 . 24 MIN " 6" x 6" OPENING FOR GAS/ELEC. CONNECTIONS 4 to 12" 2" x 4" SUPPORT MIN. 10" 2" x 4" SUPPORT E G GAS/ELEC. LOCATION 2" x 4" SUPPORT For all Double Wall Ovens 10 13592 Desmond St., Pacoima, CA 91331 818.897.0808 tel 888.753.9898 toll free www.americanrange.
Installation Manual Residential Wall Ovens SPECIFICATIONS & ELECTRICAL REQUIREMENTS DOUBLE WALL OVEN Description Overall Width Overall Height Overall Depth: To the edge of control panel With French Door open With Chef Door open Gas / Gas 30” 58-5/8” Electric / Electric 30” 58-5/8” Gas / Electric 30” 58-5/8” 26-1/2” 39-1/2” 45-1/4” 26-1/2” 39-1/2” 45-1/4” 26-1/2” 39-1/2” 45-1/4” Cutout Width Cutout Height Cutout Depth 28-1/2” 57-1/2” 24-1/2” min 28-1/2” 57-1/2” 24-1/2” min 28-1/2” 57-1/2” 24-1/2”
Installation Manual Residential Wall Ovens GENERAL INSTRUCTIONS • Do not remove protective packaging until you are ready to perform the installation. • Do not remove the protective wrapping from the product control panel until the product is installed. • Use proper equipment to move products. • Any openings in the wall and in the floor behind or under the appliance must be sealed. ! ! ! WARNING Do not use an extension cord with this appliance.
Installation Manual Residential Wall Ovens INSTALLATION INSTRUCTIONS STEP 1 For “chef door” models, remove door(s). NOTE: DO NOT REMOVE FRENCH DOORS. Open door completely. Place pins, supplied with unit in pin hole. For personal safety, only use the pins supplied with the unit. STEP 2 Remove hinge trim screws, take off hinge trim, identify right and left hinge for future re-installation. 13 13592 Desmond St., Pacoima, CA 91331 818.897.0808 tel 888.753.9898 toll free www.americanrange.
Installation Manual Residential Wall Ovens INSTALLATION INSTRUCTIONS STEP 3 Softly close until the pins stop door. STEP 4 Lift door up and out. Do not use handle to lift door, grab by the sides of the door. 14 13592 Desmond St., Pacoima, CA 91331 818.897.0808 tel 888.753.9898 toll free www.americanrange.
Installation Manual Residential Wall Ovens INSTALLATION INSTRUCTIONS STEP 5 NEUTRAL Remove racks. WHITE GREEN RED BLACK FROM OVEN STEP 6 Place Oven infront of cabinet opening for access to wiring. WHITE NEUTRAL NEUTRAL STEP 7 Wiring option 1. Recommended. RED RED GREEN WHITE GREEN BLACK BLACK FROM OVEN FROM OVEN Connect the white to the incoming neutral. Attach the green to suitable ground. 15 CONNECT THE WHITE AND GREEN TO THE INCOMING NEUTRA 13592 Desmond St., Pacoima, CA 91331 818.
Installation Manual Residential Wall Ovens INSTALLATION INSTRUCTIONS GREEN STEP 7 GREEN Wiring option 2. WHITE RED BLACK FROM OVEN Connect the white to the incoming neutral. Attach green to the grounded junction box. 16 13592 Desmond St., Pacoima, CA 91331 818.897.0808 tel 888.753.9898 toll free www.americanrange.
Installation Manual Residential Wall Ovens INSTALLATION INSTRUCTIONS STEP 8 Lift oven into position. STEP 9 Push oven straight in. 17 13592 Desmond St., Pacoima, CA 91331 818.897.0808 tel 888.753.9898 toll free www.americanrange.
Installation Manual Residential Wall Ovens INSTALLATION INSTRUCTIONS STEP 11 Attach the screws to the side trims. NOTE: 4 screws are used for single wall oven, 4 screws are used for double wall oven. STEP 12 Replace racks. 18 13592 Desmond St., Pacoima, CA 91331 818.897.0808 tel 888.753.9898 toll free www.americanrange.
Installation Manual Residential Wall Ovens INSTALLATION INSTRUCTIONS STEP 13 Replace door. STEP 14 Open door completely. Put hinge trim plates back on. Secure with screw. 19 13592 Desmond St., Pacoima, CA 91331 818.897.0808 tel 888.753.9898 toll free www.americanrange.
Installation Manual Residential Wall Ovens INSTALLATION INSTRUCTIONS STEP 15 Take out pins and close door. Save pins for future use. 20 13592 Desmond St., Pacoima, CA 91331 818.897.0808 tel 888.753.9898 toll free www.americanrange.
Installation Manual Residential Wall Ovens PERFORMANCE CHECKLIST A qualified installer should carry out the following checks: Refer to User Manual to perform the following check points. 0 Check operation of Bake at 350º. 0 Check operation of Convection Bake. 0 Check operation of Broil function. 0 Check operation of fan with open doors. 0 Check operation of oven. 0 Check operation of all indicator lights on control panel. 0 Check operation of proof function if equipped.
WARRANTY REQUIREMENT For reliable operation and for your own safety, this professional cooking equipment must be installed by a certified/licensed contractor. Failure to comply will void any written or implied warranty. Should the equipment require service during the standard warranty period, the receipt proving certified installation must be made available to American Range for verification.