
Installation Guide


3
7301354-100 Rev. B
B
C
2-G
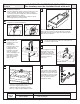
Connect trap to drain assembly hand tight to
check alignment. It may be necessary to cut
off part of the tailpiece (area “B”) or part of the
horizontal leg of the trap (area “C”). Secure
joints for watertight assembly.
2-F
Connect supply line to faucet (finger tight) and
carefully bend tubes to engage with the
supply shut-off valves. Tighten connections at
faucet and shut-off valves for secure seal.
Shut-Off Valves
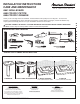
2. Wall-hung on furniture
2-C
Vanity Installation:
• Place the sink temporarily on the vanity to
check for alignment and clearance
Mounting on Furniture:
Assemble vanity as per instructions.
2-A
2-D
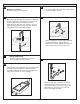
After checking fit and alignment, turn sink upside down
and apply a generous portion of silicone adhesive
around the under side of the rim near the edge. Place
sink in position. Wipe off excess adhesive.
Mount the faucet and drain assembly (not included) on
the sink following the manufacturer’s instructions. Be
certain to apply a bead of sealing putty on the
underside of the drain (Part “A”) in order to ensure a
watertight seal between the sink and drain. Remove
excess putty after installing drain on sink.
2-B
A
2-E
Use the mounting holes on the rear of the lavatory
to secure the sink to the wall.