
Installation Guide


7302242-100 Rev. A
3
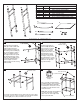
Wall Preparation for Sink and Pedestal/Console Installation
Provide suitable reinforcement behind nished wall for sink hanger screws.
For an installed sink height of 35-5/8" (905mm) center the reinforcement
33-5/8" (854mm) above the oor
Note: If replacing an existing sink be certain to shut off water supply prior
to removing old sink.
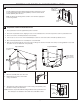
Preparation of Sink and Pedestal/Console
1. Place pedestal/console into approximate position near wall.
2. Place sink on pedestal/console, aligning recesses on the underside of the sink to the respective location on pedestal/console.
3. Place a level on the sink and pedestal/console assembly.
4. If necessary use one or more of the included bumper cushions to level and cushion sink slab to pedestal/console.
5. Move sink and pedestal/console assembly into contact with wall.
6. With a pencil, mark through the center of the two mounting holes found on the back of the sink. (If securing pedestal to oor, mark
the center of holes on the bottom of the pedestal.)
C/L of 2 x 6
Support
and Bracket
Finished
Floor
33-5/8"
(854mm)
PEDESTAL AND CONSOLE LAVATORY INSTALLATION
1
2
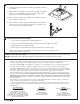
Anchor Screw Installation
3
Top of Console
Possible bumper
locations
Top of Pedestal
Example bumper
locations to raise
the left side of the
sink.
1. Move the assembly well clear of the wall.
2. Drill two pilot holes at the center marks
using a 1/4" drill bit.
3. Thread the two 5/16" headless hanger screws leaving 1-7/8" (48 mm) of the
threaded end exposed as illustrated.
Note: Pedestal is not provided with mounting hardware. Various pedestal screw
sizes and types are available to the installer at local hardware outlets.
1-7/8"
(48 mm)
Anchor
Screw
Washer
Lavatory
Nut