
Installation Guide

2
7301997-100 01/20
5 6
4
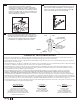
Set the pedestal back in place. Put a 3/4" (19mm)
washer on each of the screw(s), then screw the
screw(s) for the pedestal loosely to the oor.
1
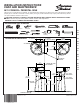
Provide suitable reinforcement behind finished wall for lavatory
mounting screws and brackets (reference FIGURE 1).
The centerline of the cross braces should be 28-3/4" (730mm)
up from the floor on both walls.
3
2
Hangers provided with the lavatory should be mounted
11" (279mm) (Center of Slot of Hanger) from the corner
and 28-3/4" (730mm) up from the oor on each wall.
(reference ROUGHING-IN and FIGURE 2) Tighten the
hanger, (center slot only) until they will support the
lavatory leaving “play” for nal adjustment later. Make
sure hanger is in its highest position when snugging
hanger. Set the lavatory in place.
28-3/4" (730mm)
28-3/4" (730mm)
FLOOR
FIGURE 1
28-3/4"
(730mm)
28-3/4"
(730mm)
11"
(279mm)
11"
(279mm)
WALL
WALL
FLOOR
FIGURE 2
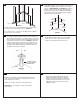
FIGURE 3
FLOOR
WALL WALL
(2)-PEDESTAL BASE
ANCHOR SCREWS
NOT SUPPLIED
Position the pedestal leg by using the recess indentation on
the underside of the lavatory as a guide and t to the lavatory
with no gaps. The back side of the leg should be vertical and
away from the wall surface (reference FIGURE 3). Mark the
location of the hole(s) in the bottom of the leg. Remove the
leg, then drill the starter hole(s) as marked. These hole(s)
should be 1-1/2" (38mm) deep. Insert a plastic expansion
shield into each hole(s) if required.
Examine the alignment of the pedestal lavatory to the wall
to be sure it is centered where you want it. Also check the
level and adjust as needed.
Tighten the screw(s) at the base of the pedestal leg.
CAUTION: Do not overtighten, as this may crack the
vitreous china.
Remove the lavatory and slide the hangers
upward to their highest positions. Reset the
lavatory to position the hangers in their nal
position. Remove the lavatory once more and
tighten the hangers rmly into place using
additional screws.