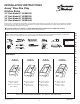
INSTALLATION INSTRUCTIONS Avery™ Fine Fire Clay Kitchen Sinks 30" Sink Model# 1180SB3020 33" Sink Model# 1180SB3320 36" Sink Model# 1180SB3620 36" Sink Model# 1180DB3620 Thank you for selecting American Standard – the benchmark of fine quality for over 100 years. To ensure this product is installed properly, please read these instructions carefully before you begin. (Certain installations may require professional help.) Also be sure your installation conforms to local codes.
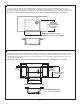
MOUNTING OPTIONS Flush Mount Installation * COUNTERTOP Under Countertop Installation * * NOTE: Chinaware dimensions can vary. Please use the actual size of the sink that you will be installing in order to determine the cutout dimensions for your countertop. REPLACEMENT USE When replacing an original unit be sure to shut off water supply before removing the lavatory or disconnecting water supply lines and drain fittings. Original supplies and shutoff valves should be replaced on installation.
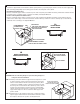
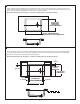
2 SUPPORT FRAME Construct a support frame to fit inside the cabinet opening. Ensure you provide proper clearance for faucet, water supply lines, drain assembly, garbage disposal mounting system and the structural parts of the cabinet. Flush Mount Installation Note: Ensure to install the support frame so that the top rim of the sink, (when placed within the frame), will be level and flush with the top surface of the countertop, (when countertop is installed). See diagram 2A below.
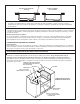
A FLUSH MOUNT INSTALLATION Using carpenters square carefully measure and mark the location of the cutout opening in the countertop. Flush mount cutout opening is determined from the actual sink size. The cutout opening should equal the maximum dimensions of the sink to ensure a minimum gap between the sink and the countertop opening. Note: Check dimensions on first page as a reference and measure the sink being installed.
A APPLY SEALANT APPLY SEALANT THREE SIDES For Flush Mount Sinks: Carefully wipe clean the sink apron and top rim free from all debris. Ensure that the surface on underside of countertop and around the countertop cutout opening is smooth and free of debris. Flush mount installation requires a generous bead of sealant around the sink apron where sink and countertop will meet.
AS AMERICA, INC. LIMITED WARRANTY FOR FINE FIRE CLAY KITCHEN SINKS If inspection of this American Standard Fine Fire Clay product, within five years after its initial purchase, confirms that it is defective in materials or workmanship, American Standard Brands (“American Standard”) will repair or, at its option, exchange the product for a similar model. This limited warranty applies only to the original purchaser and installation of these products.
INSTRUCCIONES DE INSTALACIÓN Fina arcilla refractaria Avery™ Fregaderos de Cocina Fregadero de 30 pulg. Número de Modelo 1180SB3020 Fregadero de 33 pulg. Número de Modelo 1180SB3320 Fregadero de 36 pulg. Número de Modelo 1180SB3620 Fregadero de 36 pulg. Número de Modelo 1180DB3620 ! PRECAUCIÓN: EL PRODUCTO ES FRÁGIL. ¡MANIPÚLELO CON CUIDADO PARA NO ROMPERLO Y EVITAR POSIBLES LESIONES! NOTA: es posible que las imágenes no definan con exactitud el contorno de la cerámica y los componentes.
OPCIONES DE MONTAJE ENCIMERA Instalación de montaje de descarga Instalación debajo de la encimera SUSTITUCIÓN DE LA UNIDAD Si sustituye una unidad original, no olvide cortar el agua antes de retirar el fregadero o de desconectar los conductos desuministro de agua y las conexiones de desagüe. Los suministros originales y las válvulas de corte deben reemplazarse en la instalación.
2 MARCO DE SOPORTE Construya un marco de soporte para colocar dentro de la abertura del gabinete. Asegúrese de dejar espacio suficiente para el grifo, líneas de suministro de agua, conjunto de drenaje, sistema de montaje de eliminación de basura y las piezas estructurales del gabinete.
4A INSTALACIÓN DE MONTAJE DE DESCARGA Con una escuadra de carpintero mida cuidadosamente y marque la ubicación del recorte de abertura en la encimera. La abertura del montaje de descarga se determina a partir del tamaño real del fregadero. La abertura debe ser igual a las dimensiones máximas del fregadero, para garantizar una separación mínima entre el fregadero y la abertura de la encimera. Nota: Revise las dimensiones de la primera página como referencia y mida el fregadero que se va a instalar.
5A APLICAR SELLADOR Para fregaderos con montaje de descarga: Cuidadosamente, limpie con un paño la suciedad del faldón del fregadero y el reborde superior. Asegúrese de que la superficie de la parte inferior de la encimera y alrededor de la abertura del espacio de la encimera esté liso y libre de residuos. La instalación de montaje de descarga requiere una capa generosa de sellador alrededor del faldón del fregadero donde éste y la encimera hacen contacto.
GARANTÍA LIMITADA DE AS AMERICA, INC. PARA LOS FREGADEROS DE FINA ARCILLA REFRACTARIA Si, dentro de los cinco años de la compra original de este producto de fina arcilla refractaria de American Standard se confirma mediante una inspección que tiene defectos en los materiales o la mano de obra, American Standard Brands (“American Standard”) reparará o, a su opción, cambiará el producto por un modelo similar.
DIRECTIVES D’INSTALLATION Argile réfractaire de qualité AveryMC Éviers de Cuisine Évier 30 po Numéro de Modèle 1180SB3020 Évier 33 po Numéro de Modèle 1180SB3320 Évier 36 po Numéro de Modèle 1180SB3620 Évier 36 po Numéro de Modèle 1180DB3620 OUTILS ET MATÉRIAUX RECOMMANDÉS 1 2 3 4 5 6 7 8 9 10 11 12 13 14 15 16 17 18 19 20 21 22 23 24 Coupe-tube 4 5 Scellant 3 Clé universelle Carré 1 Pince à coulisse 2 Perceuse électrique 6 7 8 9 10 11 La procédure nécessite généralement l’utilis
OPTIONS DE MONTAGE COMPTOIR Installation encastrée Installation sous le comptoir REMPLACEMENT Lors du remplacement d’un évier, s’assurer que l’alimentation de l’eau est fermée avant de l’enlever ou de déconnecter les conduites d’alimentation d’eau et les raccords d’évacuation. Les conduites d’alimentation et les robinets doivent être remplacés lors de l’installation.
2 CADRE DE SOUTIEN Bâtir un cadre de soutien s’insérant dans l’ouverture au niveau de l’armoire. S’assurer de conserver suffisamment s’espace pour le robinet, les conduites d’alimentation en eau, le drain, le système de broyeur et les pièces structurelles de l’armoire.
4A INSTALLATION ENCASTRÉE À l’aide d’une équerre, mesurer avec soin et marquer l’emplacement de l’ouverture dans le comptoir. La taille de l’ouverture pour une installation encastrée est établie en fonction de la dimension réelle de l’évier. L’ouverture de la découpe doit être égale aux dimensions maximales de l’évier afin d’assurer un écart minimum entre l’évier et l’ouverture au niveau du comptoir.
5A ENDUIRE DE SCELLANT APPLIQUER DU SCELLANT SUR TROIS CÔTÉS Pour les éviers encastrés : Nettoyer avec soin le rebord supérieur et le tablier de l’évier pour enlever tout débris. S’assurer que la surface sous la découpe du comptoir et autour de la découpe est lisse et exempte de débris. L’installation encastrée nécessite l’application d’un bon ruban de scellant autour du tablier de l’évier au point de contact entre l’évier et le comptoir.
GARANTIE LIMITÉE À VIE AS AMERICA, INC. POUR LES ÉVIERS DE CUISINE EN ARGILE RÉFRACTAIRE Si l’examen de ce produit en argile réfractaire de qualité American Standard, effectué au cours des cinq années suivant l’achat initial, confirme qu’il présente un défaut de matériau ou de fabrication, American Standard Brands (« American Standard ») réparera le produit ou l’échangera, à son entière discrétion, contre un modèle semblable. Cette garantie limitée est valide uniquement pour le premier acheteur du produit.