
Installation Guide


1
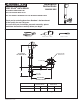
Apply putty to underside of DRAIN PLUG (1) and drop into
drain outlet.
Slip RUBBER WASHER (2) on from below and thread
DRAIN PLUG (1) into DRAIN ELL ASSEMBLY (3).
PUTTY
BATH DRAIN OUTLET
SEALANT
3
1
2
2
3
4
1
3
4
INSTALL DRAIN PLUG AND ELL
(STANDARD AND OVER-THE-RIM DRAINS)
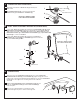
INSTALL OVERFLOW ASSEMBLY AND DRAIN TEE (STANDARD DRAIN)
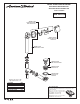
SECURE OVERFLOW ASSEMBLY TO TUB
(STANDARD DRAIN)
FIG.2
NOTE: TUB IS SHOWN CUT AWAY
FOR CLARITY OF INSTALLATION.
NOTE: TUB IS SHOWN CUT AWAY
FOR CLARITY OF INSTALLATION.
754096-100 Rev. 3 (1/20)
1
2
3
6
FIG.1
Loosen SLIP JOINT NUT & SEAL (1) and install onto OVERFLOW TUBE (2). Install
OVERFLOW TUBE ASSEMBLY (2) into the appropriate leg of the DRAIN TEE (3).
Apply sealant to threads of TAILPIECE (6) and thread into DRAIN TEE (3). Install
OVERFLOW GASKET (4) to OVERFLOW TUBE ASSEMBLY (2). (Adjust OVERFLOW
GASKET (4) to couture of tub. FIG.1.
Loosen SLIP JOINT NUT & SEAL (5) and install onto DRAIN ELL
ASSEMBLY (6). Install DRAIN ELL ASSEMBLY (6) into the horizontal
leg of the DRAIN TEE (3). FIG 2.
5
Align the holes in the RETAINING PLATE (1) with those in the GASKET (2)
and OVERFLOW FLANGE (3). Install SCREWS (4), tighten snugly (do not over
tighten). The overflow gasket (behind tub wall) will begin to seal as the RETAINING
PLATE (1) becomes tighter. The overflow gasket can be rotated for
desired fit.
Align the ESCUTCHEON (5) with the RETAINING PLATE (1) and
push onto RETAINING PLATE (1) until the ESCUTCHEON (5)
snaps into place.
When you are satisfied with the overall fit of the drain,
go back and tighten all joints to make a water tight seal.
52