
Installation Sheet


791640-100 Rev. A 11/17- 2 -
FOR DROP-IN SINK INSTALLATION
CHECK CUTOUT DIMENSIONS
2
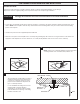
Check the countertop cutout opening by placing the sink in the opening to be sure it is sized properly. The rim
of the sink must be set uniformly on the countertop to ensure the corners of the sink seat properly. If the sink
does not fit adjust the cutout opening using the saber saw.
PREPARING THE COUNTERTOP
1
Make sure there are no obstructions such as cabinets,
plumbing, etc. below or above the countertop.
Place template on countertop checking to make sure the
sink will line up correctly with plumbing.
NOTE: If not using a template, turn sink upside down on
counter top and trace a line of the outer rim using a pencil.
Remove the sink from the counter top and draw a cutout
line 5/16" (8mm) inside the original rim outside line with
1-1/2" (38mm) radius corners.
To begin the cutout for the sink, drill a hole then use a
sabersaw to carefully cut along the template or pencil line.
Perimeter
of sink
Cutout
Perimeter
of sink
Cutout
4
Apply a generous portion of sealant inside line traced on countertop.
NOTE: Your sink may not come with the strainer and faucet assembly in
which case you will need to purchase separately and follow instructions
included with the purchased products.
Install the strainer as shown.
Install the faucet following the instructions included with the faucet.
PREPARING THE STRAINER AND FAUCET ASSEMBLY
3
Bottom of sink
Below
sink