
Instructions / Assembly


- 5 -
791679-100 Rev. C 1/18
3
SINK INSTALLATION
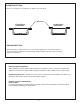
PLACE A THIN LAYER OF SEALANT AROUND
TOP EDGE OF SUPPORT FRAME
4A
ACTUAL SINK DIMENSIONS
ARE SAME AS COUNTERTOP
CUTOUT DIMENSIONS
ACTUAL SINK DIMENSIONS ARE SAME
AS COUNTERTOP CUTOUT DIMENSIONS
Installing Countertop - Flush Mount Installation
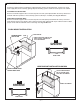
STEP 1. Carefully set the sink within the support frame and position in center of cabinet opening. If flush mounted
ensure that the sink top rim surface is level and flush with the countertop top surface, (when countertop is installed -
reference Flush Mount Installation and 2A). If under mounted ensure that the sink top rim is level and flush with
cabinet top surface. Check clearance around sink apron and ensure sink is centered within cabinet opening. Ensure
sink base is making proper contact with support frame. Adjust or shim as needed to obtain proper sink position and
fit. (Reference Under Mount Installation and 2B.)
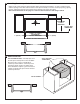
STEP 2. Carefully remove sink and place a thin layer of sealant around top edge of support frame where the sink
and frame will make contact. Then replace sink back into position. See diagram below.
Using carpenters square carefully measure and mark the location of the cutout opening in the countertop.
Flush mount cutout opening is determined from the actual sink size. The cutout opening should equal the
maximum dimensions of the sink to ensure a minimum gap between the sink and the countertop opening.
Note: Check dimensions on first page as a reference and measure the sink being installed.
CAUTION: Sink is heavy. For personal safety, use extra person for assistance with installation.