
Installation Guide


M968918 Rev.1.5 (4/15)
4
3
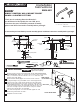
INSTALL HANDLE
2a
DRAIN INSTALLATION
Assembly GASKET (2) WASHER (3) and LOCKNUT (4) onto DRAIN BODY (1).
Tighten LOCKNUT (4) firmly.
Apply Teflon Tape to TAILPIECE (5) and thread onto DRAIN BODY (1).
Apply a bead of PUTTY to underside of FLANGE on DRAIN BODY (1).
Feed DRAIN BODY (1) down through lavatory.
LAVATORY
PUTTY
2
3
4
5
1
2
INSTALL WALL SPOUT
INSTALL WALL SPOUT
Install HANDLE (4) onto VALVE STEM (1) and tighten
SET SCREW (5) with 2.5mm HEX WRENCH (6) supplied.
Install PLUG BUTTON (7) into HANDLE (4).
Attach HANDLE ADAPTER (2) to VALVE STEM (1) with
ADAPTER SCREW (3). Tighten fully.
Push VALVE STEM (1) down to off position.
1
2
5
6
6
11
3
3
Remove PLASTER GUARDS (1, 1a) from VALVE BODY and
SPOUT NIPPLE (2).
Apply thread sealant to SPOUT NIPPLE (2).
Thread SPOUT MOUNT (3) onto SPOUT NIPPLE (2) using a
10mm Hex Wrench. Tighten completely.
Install SEAL (4) into SPOUT ESCUTCHEON (5).
Place SPOUT ESCUTCHEON (5) with SEAL (4)
onto SPOUT (6). Fig. A
Push SPOUT (6) onto SPOUT MOUNT (3).
Align SPOUT (6) and tighten SPOUT SET
SCREW (7) with 2mm HEX WRENCH
(8) supplied. Push SPOUT ESCUTCHEON
(5) against finished wall.
APPLY
SEALANT
4
7
9
8
10
3
7
1a
10mm HEX
WRENCH
Fig. A
Fig. B
Install SEAL (9) into VALVE
ESCUTCHEON 10). Place VALVE
ESCUTCHEON (10) with SEAL (9)
onto VALVE (11). Push VALVE
ESCUTCHEON (5) against finished wall. Fig. B
1
2
4
5
6