
How to Guide


791624-100
- 3 -
A
B
Single Bowl
Tra p
Double Bowl
Tra p
Connect drain assembly hand tight
to check alignment. It may be
necessary to cut off part of the
tailpiece (area "A") or part of the
horizontal leg of the trap (area "B").
Secure joint for watertight assembly.
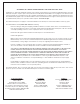
BEFORE YOU BEGIN...
CAUTION
Strongly Recommend For Professional Installers to Perform Installation.
FOR UNDERCOUNTER MOUNTING SINK INSTALLATION
Unpack new sink and inspect carefully for damage. Notify your American Standard distributor of any damage.
Replace the sink in its original packing carton to protect it until you are ready to begin installation.
6
8
5
7
9
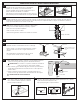
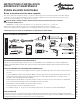
• Locate sink to be installed. Provide proper clearance under the countertop for the faucet supply lines and the structural parts of your
cabinet. NOTE: Some templates share the drop-in and undercounter mounting. Make sure you used the undercounter mounting
portion of the template.
• Cut the inner portion from the supplied template and discard.
• Attach the outer portion of the template to the countertop using masking tape. Be sure there is enough clearance for the faucet and
supply line. If the template has a hole for the faucet, use 1-3/8" (35 mm) diameter hole saw to cut hole on the countertop.
Countertop
Template
Cutout
template
Cutout
Countertop
Template
2
4
1
3
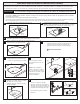
Drill a clearance hole inside the cutout line.
Fasteners for under counter mounting sink ARE NOT included. Anchor and clips should be supplied by your countertop supplier.
Please consult your countertop supplier to install anchors into the the underside of countertop.
Cut opening on cut line of the template.
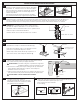
Apply sealant to the rim of the sink near the inside edge.
Be careful not to miss or skip an area.
Apply silicone sealant (optional).
Wipe away any excess sealant.
Fill voids and allow to cure.
Lift the sink into place. Follow the instructions
from your countertop supplier in order to
tighten the mounting hardware evenly.
DO NOT OVERTIGHTEN
NOTE: Contact your countertop distributor for the best method
of cutting materials such as marble, hard synthetics, etc.
Countertop
Mount the faucet and strainer
assembly following the
manufacturer's instructions.
Connect supply lines to faucet finger
tight, and carefully bend to engage with
the supply stops. Tighten connections
to faucet for secure seal.
!
Below
sink
NOTE: Your sink may not
come with the strainer and
faucet assembly in which
case you will need to
purchase separately and
follow instructions included
with the purchased products.