
Installation Sheet


755503-100
2
INSTALLATION AND FRAMING INSTRUCTIONS:
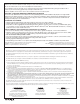
A.) Locate studs as required. Ensure roughing-in
dimensions are proper, plumb, and square
(Fig. 1). It is strongly recommended that an
additional opening be provided for access to
the drain components.
B.) As shown in Fig. 2, mark the position of the underside of the deck by tracing a line onto the studs at the height indicated,
using a level or other suitable straight edge.
C.) With the top of the stringer touching the traced line, attach the stringer to the studs.
1
Fig. 1
Each alcove stud
must be plumb
and square.
1. When installing coordinating bath walls, additional studs may be required.
Refer to those installation instructions prior to installing tub.
2. Bath walls are to be installed over stud walls.
3. Bath may only be installed in a recess or fold over edge type installation.
4. It is recommended that the 2544 and 2545 Town Square S Tub be set in a small bed of mortar or grout to
compensate for uneven floors. Stringers will help level tub, but will not provide adequate support.
5. Take extra care when driving nails or screws to avoid damaging the tub.
GENERAL INSTALLATION INFORMATION ...
Fig. 2
18-3/4"
(476mm)
A
Model 2545 30" (762mm)
Model 2544 32" (813mm)
28-1/2" (724mm)
30-1/2" (775mm)
TUB DIMENSION ‘A’
D.) Install drain components to the bath following the manufacturer's instructions. See the roughing-in drawing for
suggested opening size and location dimensions.