
Installation Guide


7302429-100 Rev. 1 2/20
- 3 -
CARE AND CLEANING
When cleaning your toilet, wash it with mild, soapy water, rinse thoroughly with clear water and dry with a soft cloth. Avoid detergents,
disinfectants, or cleaning products in aerosol cans. NEVER use abrasive scouring powders or abrasive pads on your toilet seat. Some
bathroom chemicals and cosmetics may damage the seat's finish.
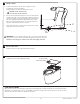
INSTALL COVER
Install rear seat cover by snapping into place.
!
WARNING: Do not use plumber’s putty, pipe dope, or any other sealant on the water
supply connection. If the connection leaks after hand tightening, replace the supply line.
Warranty is void if any type of sealant is used on the water supply connection.
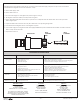
9
a. Position toilet squarely to wall and, with a rocking motion, press
bowl down fully on wax ring and flange.
Alternately tighten nuts until toilet is firmly seated on floor.
b. Once toilet is fully installed and flange nuts secured, carefully turn the
Regulator to the right (clockwise). This will give additional clearance to
connect the supply line coming from behind the toilet to the Regulator.
Turn water supply ON and flush toilet approximately 3 times to fully
prime toilet and allow approximately 45 seconds between flushes to
fully prime system with water. Check for any leaks.
c. Apply sealant around base perimeter. Smooth off the bead of sealant
around base. Remove excess sealant.
CAUTION: DO NOT OVERTIGHTEN
NUTS OR BASE MAY BE DAMAGED!
!
INSTALL TOILET
7
8
INSTALL TOILET SEAT:
Install toilet seat in accordance with manufacturer's directions.
BOLTS
CLOSET FLANGE
FLUSH BUTTON
REAR SEAT COVER