
Installation Guide


Apply a generous bead of silicone caulking to
the base of the tub including the cross-braces
(if cross-braces are present). (See Fig. 5)
5
4
755021-100 Rev. 4 8/19
Carefully set the tub into position. Ensure that drain strainer gasket is fully seated against the tail piece flange.
Connect the tailpiece to the tub drain. Tighten all of the drain connections. Remove any excess caulking
where the tub meets the floor.
Note: Connecting the tailpiece assembly and the drain will require access from beneath the tub.
If using the OS&B
®
Island Tub Drain or similar product, follow the drain connection instructions
provided by the manufacturer.
6
Fill the tub with water and drain. Check for leaks and re-tighten connections as necessary.
7
8
Apply a bead of Tub & Tile caulk around the bottom edge of the tub where it meets the floor.
Remove any excess caulking.
3
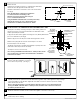
The tail piece assembly, consisting of tail piece, drain strainer gasket and
slip-joint nut used to connect the the tub drain to the drain/waste outlet,
shall be provided by the installer.
A slip-joint nut, drain strainer gasket and a flanged, 1-1/2" (38mm) diameter tail
piece is recommended. (See Fig. 4)
Slide the slip-joint nut over tail piece towards the flanged end as shown.
Slide the P-trap slip-joint nut and seal over the tail piece as shown.
Insert the tail piece into the P-trap.
Remove the tub.
Using the traced outline for reference, confirm that the drain/waste
outlet in the floor will align with the tub drain outlet.
(Tub drain outlet will be located in the center of the traced outline.
See Fig. 3)
Note: The drain/waste outlet must be installed in
accordance with all local building codes.
All drain connections must be made using an
access created beneath the tub.
Using the OS&B
®
Island Tub Drain or similar product may
eliminate the need for an access panel. Refer to the
manufacturer's installation instructions for details.
4
DRAIN STRAINER
GASKET
SLIP-JOINT NUT
TAIL PIECE
P-TRAP
(PROVIDED BY
INSTALLER)
FIG. 4
FIG. 5
FIG. 3
DRAIN
FLOOR CUTOUT
TRACED
OUTLINE
THREADED PORTION
OF DRAIN BODY
TAIL PIECE
ASSEMBLY
(PROVIDED BY
INSTALLER)
2"
(51mm)
FINISHED
FLOOR
INSTALLING THE 1-1/2" DIAMETER TAIL PIECE ASSEMBLY INTO P-TRAP
The flange of the tail piece should be approximately 2" (51mm) above the
finished floor when fully inserted to the P-trap.
The tail piece can be cut if necessary.
Note: If using the OS&B
®
Island Tub Drain or similar product, the tail
piece should not be cut. Refer to the manufacturer's installation
instructions for details.
P-TRAP
SLIP-JOINT
NUT & SEAL
(PROVIDED BY
INSTALLER)