
Installation Guide


INSTALLATION INSTRUCTIONS:
Place the tub on a finished, level floor in the
desired location.
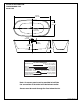
Using an erasable pencil or marker, trace the outline of
the base of the tub on the floor. (See Fig. 1)
1
Using the adjustable feet on the underside of the tub, ensure
that the tub is level.
Ensure that there is a gap between the tub base and the floor.
Gap shall not exceed 3/16" (5mm). (See Fig. 2)
2
4
3
The tail piece assembly, consisting of tail piece, drain strainer gasket and
slip-joint nut used to connect the the tub drain to the drain/waste outlet,
shall be provided by the installer.
A slip-joint nut, drain strainer gasket and a flanged, 1-1/2" diameter tail piece
is recommended. (See Fig. 4)
Slide the slip-joint nut over tail piece towards the flanged end as shown.
Slide the P-trap slip-joint nut and seal over the tail piece as shown.
Insert the tail piece into the P-trap.
Remove the tub.
Using the traced outline for reference, confirm that the
drain/waste outlet in the floor will align with the tub drain outlet.
(Tub drain outlet will be located in the center of the traced
outline. See Fig. 3)
Note: The drain/waste outlet must be installed in
accordance with all local building codes.
All drain connections must be made using an
access created beneath the tub.
4
755021-100 Rev. C
DRAIN STRAINER GASKET
SLIP-JOINT NUT
TAIL PIECE
P-TRAP
FIG. 4
3/16" MAX
(5mm)
FIG. 1
FIG. 2
FIG. 3
(PROVIDED BY
INSTALLER)
DRAIN
FLOOR CUTOUT
TRACED
OUTLINE
THREADED PORTION
OF DRAIN BODY
FINISHED FLOOR
TAIL PIECE
ASSEMBLY
2"
(51mm)
FINISHED
FLOOR
INSTALLING THE 1-1/2" DIAMETER TAIL PIECE ASSEMBLY INTO P-TRAP
The flange of the tail piece should be approximately 2" (51mm) above the
finished floor when fully inserted to the P-trap.
The tail piece can be cut if necessary.
SLIP-JOINT NUT
P-TRAP
& SEAL
(PROVIDED BY
INSTALLER)
(PROVIDED BY
INSTALLER)