
Installation Guide


OWNERS MANUAL
15
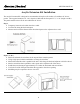
Drain Overflow Installation
Drain / Overflow Information
A drain / overflow assembly is provided with the tub must be installed on the bath, water tested
and connected to the sanitary system of the house. Some drain / overflow kits are packed with
the waste flange, strainer, overflow cover, and fasteners, packed separately within the kit to
protect the trim finish. Follow the installation instructions provided with the drain / overflow
kit. After the drain is fully installed, test the unit for proper drainage. If the unit does not drain
properly, rectify the condition before proceeding with installation. American Standard is not
responsible for the removal or re-installation costs.
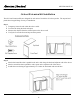
Note: All gel coat models require additional installation of the door drain to the waste overflow.
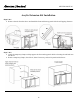
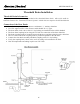
Connection of the Quick Drain
Quick Drain System requires the connection to a minimum 1 ½” sanitary drain line.
Use UPC Approved PVC Glue, Primer, and Schedule 40 1 ½” pipe.
Do not change or modify the location and or piping of the Back Flow Manifold
The sanitary tee is installed directly above the drain tee with clearance not greater than 1”.
Dry fit the drain overflow assembly to the sanitary drainage pipe and check for proper fit.
Glue the Quick Drain Fittings, pipe and drain overflow assembly to the sanitary drainage pipe.
NOTE: Water tight installation of the waste / overflow is the installer’s responsibility. Drain leakage is
excluded from Safety Tubs warranty of this product.
We have taken reasonable precautions to ensure the Quick Drain is suitable for residential
plumbing. It is the responsibility of the installer to insure the sanitary system is acceptable for the
use of the Quick Drain. We do not accept responsibility for damage arising from the use of the
Quick Drain.