
Instructions / Assembly


7301416-100 Rev. L 1/16
- 3 -
10
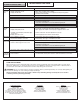
FLUSH BUTTONS ON TANK
The Light Flush Button (with 3 dots) should line up over the blue actuator on the flush tower in the tank.
The Heavy Flush Button (with 9 dots) should line up over the white actuator on the flush tower in the tank.
Light Flush Button (with 3 dots) for liquid waste.
Heavy Flush Button (with 9 dots) for solid waste.
TIPS:
If the bowl still does not flush properly after following the steps outlined in the troubleshooting guide, remove the tank lid and push one of the flush
buttons on top of the flush valve in the tank. If the flush appears to be normal, you will need to adjust the length of the threaded rods for the push
buttons mounted on the tank lid with the settings as follows:
1. Turn the lid upside down.
2. Loosen the black plastic lock nut.
3. Adjust the white threaded rod one turn counterclockwise.
4. Re-tighten the black plastic lock nut.
5. Put lid back on tank and test the flush. If it is still not flushing properly, repeat Tips Steps 1 through 4 (above) until the problem is resolved.
6. If one counterclockwise turn is too much and causes the flush valve to stay open, adjust 1/2 turn clockwise and tighten lock nut.
A
WHITE
THREADED ROD
INSTALL & ADJUST ROD
LENGTH TO 2-7/8" (75mm)
BLACK PLASTIC
LOCK NUT
BLACK PLASTIC
LOCK NUT
WHITE
THREADED ROD
Install the Button Rods (see A below) by threading into
lower button until 2-7/8" (75mm) rod length is achieved.
ADJUSTMENTS
a. Adjust water level. Water level should be adjusted
to level indicated on tank by adjusting as follows:
1. Major water level adjustment - see Page 4
2. Minor water level adjustment - see Page 4
b. Flush Valve Setting Adjustments
*
:
c. Refill Control set at 2
NOTE: All other settings will result in either more
or less water and are not recommended.
• To remove Flush Valve, apply slight
downward pressure and twist it until the
flush valve disengages from the bayonet.
• To reinstall Flush Valve, reverse the
above procedure.
FLUSH VALVE
SETTINGS
Heavy Flush Float
Heavy Flush Door
Light Flush Float
Rell Float Cup
Rell Door
8
5
12
8
2
WITHOUT
LINER
5-1/2
5
9
7
2
WITH
LINER
4
2
9
8½
0
FULL
MIN
2#-01
POM
MAX
7
5
3
1
1
1
FULL
MIN
2#-01
POM
MAX
7
5
3
1
7
5
3
1
1
1
PUSH BUTTON
SILICON
SEAL
WATER LINE
HALF
MIN
2#-01
POM
MAX
1
1
6
5
HEAVY FLUSH
FLOAT
ADJUSTMENT
*
HEAVY FLUSH
DOOR
ADJUSTMENT
*
LIGHT FLUSH
FLOAT
ADJUSTMENT
*
REFILL DOOR
*
REFILL
FLOAT
CUP
*
2
FULL
MIN
MAX
7
5
3
1
1
1
DUAL FLUSH MODELS ONLY
FOR SINGLE FLUSH MODELS GO TO STEP 11
Continued on
next page
See table (Step 10b) for
Flush Valve Setting Adjustments
*