
Installation Guide


- 2 -
755578-100 Rev. B 7/18
Illustration 4
Illustration 5
2
1
DRY FITTING THE PANELS ON THE WALL
1) Dry fit the panels starting with the rear panel first keeping it centered, equal
distance between the 2 rear corners of the wall. Mark a vertical line top to bottom
at the corner edges of the panel on the rear wall to ensure panel is centered
between the 2 corners as a reference.
See Illustration 2
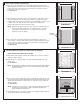
2) When dry fitting for side panels, place the panels entrance edge at the desired
location on wall while also ensuring a gap or distance no greater than 7-3/4"
(197mm) exists at the panels back corner to the rear wall. Mark a vertical line top
to bottom on the side wall near the corner at back edge of side panel to
reference later. Repeat for opposite side panel wall.
NOTE: Verify that the gaps at both rear corners can be covered by the “Corner
Panels” by dry fitting or placing a corner panel in each corner while
observing the corner panel covers or overlaps both rear and side
panels by at least 1/4" (6mm).
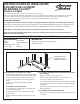
3) Once side panels are properly dry fitted, mark all plumbing locations where
shower valves or shower heads come through the side panel. Drill holes at each
location using hole saws large enough to accommodate the opening but small
enough to be covered by the trim plates.
See Illustration 3
APPLYING ADHESIVE TO DRYWALL AND SEALANT TO TUB BASE
NOTE – INSTALL ONLY ONE WALL AT A TIME.
1) Wipe all back side of panels and walls with a damp cloth to remove any dust or
debris and allow to fully dry.
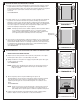
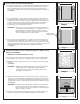
2)
Apply adhesive in a zig-zag pattern on the wall, keeping bead thickness to 1/8"
(3mm) or less.
See Illustration 4
NOTE: Applying beads of adhesive thicker than 1/8" (3mm) may make it difficult
to spread behind the panel once it is up and installed creating a ripple
effect on the panel.
3)
Move rear panel onto the wall keeping a space of approximately 1/8" (3mm)
off of the
surface of the tub deck and keeping panel between the marked lines previously
drawn. Press panel firmly over entire surface to ensure firm contact of panel to
adhesive on wall.
See Illustration 5
NOTE: It may be necessary to brace or support the panel against the wall until
the panel
stays securely in place. Place a cloth under the supports to
prevent marring of the walls surface.
4) Install side panels in the same manor using the same adhesive pattern. Wipe off
any excessive adhesive with mineral spirits.
Support
Braces
Illustration 3
Illustration 2
Plumbing
locations