
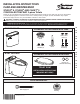
Installation Guide

CARE AND CLEANING:
When cleaning your toilet, wash it with mild, soapy water, rinse thoroughly with clear water and dry with a soft cloth.
WARNING: Do not use in-tank cleaners. These products can seriously corrode fittings in the tank. This damage can
cause leakage and property damage.
American Standard shall not be responsible or liable for any damage caused by the use of in-tank cleaners.
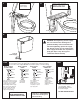
Water Level Adjustment Knob
Trip Lever Rod
Flush
Valve
Flapper
Water Supply Line
Tank to Bowl Gasket
Approximate
Water Level
Flush Valve
Chain
Fill Valve
Or Water
Control
Float Cup
Refill Tube
Overflow
Tube
Flapper Seal
C
Adjust water level
to level indicated
on tank by turning
water level
adjustment knob
to move float cup
up or down.
A
B
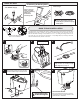
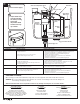
Turn on water supply.
7301555-100 Rev. 3 3/20
- 4 -
In the United States:
American Standard Brands
1 Centennial Ave.
Piscataway, New Jersey 08854
Attention: Director of Customer Care
For residents of the United States, warranty
information may also be obtained by calling the
following toll free number: (800) 442-1902
www.americanstandard.com
In Canada:
LIXIL Canada, ULC
5900 Avebury Rd.
Mississauga, Ontario
Canada L5R 3M3
Toll Free: (800) 387-0369
www.americanstandard.ca
In Mexico:
American Standard B&K Mexico
S. de R.L. de C.V.
Via Morelos #330
Col. Santa Clara
Ecatepec 55540 Edo. Mexico
Toll Free: 01-800-839-1200
www.americanstandard.com.mx
Does not flush
Poor or sluggish flush
Toilet leaks
Toilet does not shut off
a. Water supply valve closed.
b. Supply line blocked.
c. Flush valve chain too loose or disconnected.
d. Sand or debris lodged in water control.
a. Bowl water level too low.
b. Supply valve partly closed.
c. Partially clogged trapway and/or drain pipe and/or vent.
d. Supply pressure too low.
a. Poor supply line connection.
b. Poor bowl to tank/floor connection.
a. Flush valve chain too tight, holding flush valve open.
b. Flush valve seat and/or flapper worn or deformed.
c. Sand or debris lodged in water control.
a. Open valve and allow water to fill tank.
b. Shut off water supply, disconnect supply line and inspect all gaskets and
washers. Reassemble. Also, see Fluidmaster maintenance at:
www.americanstandard-us.com/enews/fluidmasterguide.pdf
c. Readjust chain length as required.
d. Shut off water supply. Remove cap and clean as per Fluidmaster
maintenance instructions at:
www.americanstandard-us.com/enews/fluidmasterguide.pdf
a. Check that refill tube is connected to water control and inserted into tank
overflow without being kinked or damaged.
b. Open supply valve fully. Be sure that proper supply tube size is used.
c. Remove obstruction. Consult a plumber if necessary.
d. Normal supply pressure must be at least 20 psi.
a. Review Step 10 of installation procedure.
b. Review Step 1 through 9 of installation procedure.
a. Readjust chain length as needed. Review Step 11.
b. Shut off water supply. Replace flush valve.
c. Shut off water supply. Remove cap and clean as per Fluidmaster
maintenance instructions at:
www.americanstandard-us.com/enews/fluidmasterguide.pdf
TROUBLESHOOTING GUIDE
PROBLEM POSSIBLE CAUSE CORRECTIVE ACTION
11