
Installation Guide


SERVICE
5
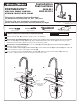
Clogged CARTRIDGE outlets or inlets may cause reduced flow.
To clean, first turn off water supply then:
6
If faucet drips, operate HANDLE several times from "off" to "on." Do not
apply excessive force.
Reverse procedure to reinstall SPOUT (9).
Remove INDEX BUTTON (1), loosen HANDLE SCREW (2) and remove HANDLE (3).
Unthread the ESCUTCHEON CAP (4). Unthread three MOUNTING SCREWS (5).
Lift CARTRIDGE (6) off MANIFOLD (7).
Replace ESCUTCHEON CAP (4), HANDLE (3), tighten HANDLE SCREW (1) and install INDEX BUTTON (2).
Clean MANIFOLD (7) and CARTRIDGE (6) ports.
Place CARTRIDGE (6) onto MANIFOLD (7) and tighten MOUNTING SCREWS (5) alternately.
CARE:
DO: SIMPLY RINSE THE PRODUCT CLEAN WITH CLEAR WATER. DRY WITH A SOFT COTTON FLANNEL CLOTH.
DO NOT: DO NOT CLEAN THE PRODUCT WITH SOAPS, ACID, POLISH, ABRASIVES, HARSH CLEANERS, OR A
CLOTH WITH A COARSE SURFACE.
M965473 Rev. 1.2
REMOVEINSTALL
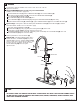
Spout leakage. If fitting leaks above or below spout RETAINING COVER (8) remove SPOUT (9) as follows
and check SPOUT O-RING. First turn off water supply.
Unthread spout RETAINING COVER (8).
Remove SPOUT (9) by pulling up gently while moving SPOUT (9) side to side.
Check SPOUT O-RING (10) for damage. Replace if necessary.
The DIVERTER (11) can be cleaned by unthreading from faucet body. Rinse the DIVERTER (9) clean and
thread DIVERTER (11) back into faucet body.
1
3
12
9
8
11
10
2
4
5
6
7
REMOVE
RETAING RING
CLIP RING
INSTALL
Reduced flow. If the flow gradually reduces over a
number of months, the AERATOR (12) may have
collected debris.To clean, remove AERATOR (12)
and rinse with water and remove any debris. Turn
on faucet to wash any debris out of the faucet.
Thread AERATOR (12) back into spout.
Operate faucet.