
Installation Instructions
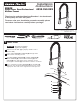

M968577 Rev.1.1
3
1
SERVICE
5
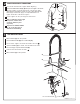
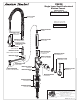
Loosen and remove LEVER HANDLE (1). Loosen
HANDLE SCREW (2) with 2.5mm Hex Wrench and
then pull HANDLE BASE (3) off.
Unscrew ESCUTCHEON CAP (4). Unscrew the
CARTRIDGE NUT (5).
Remove CARTRIDGE (6). Clean inlets of
CARTRIDGE (6) and MANIFOLD (7).
Reassemble CARTRIDGE (6). Replace CARTRIDGE
NUT (5), CAP (4) and HANDLE assembly,
check flow.
SERVICE
Clogged CARTRIDGE outlets or inlets may cause reduced
flow. To clean, first turn off water supply then:
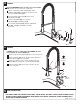
If SPOUT (3) leaks at swivel point the O-RINGS (2) need
to be replaced. To remove SPOUT (3):
Loosen the SPOUT SET SCREW (1) with a 3mm Hex wrench.
Rotate the SPOUT (3) side to side while pulling upward to
remove SPOUT (3) from faucet body.
Replace the defective parts, grease O-RINGS then push
SPOUT (3) back into position. Tighten SET SCREW (1).
Check that SPOUT (3) rotates freely and does not leak
at the swivel point.
4
6
REMOVE
INSTALL
CARE INSTRUCTIONS:
DO: SIMPLY RINSE THE PRODUCT CLEAN WITH CLEAR WATER. DRY WITH A SOFT COTTON FLANNEL CLOTH.
DO NOT: DO NOT CLEAN THE PRODUCT WITH SOAPS, ACID, POLISH, ABRASIVES, HARSH CLEANERS, OR A
CLOTH WITH A COARSE SURFACE.
2
3
1
4
5
6
7
CLEAN
3mm HEX
WRENCH
2