INSTALLATION INSTRUCTIONS CARE AND MAINTENANCE VorMax™ Right Height® Elongated 2-piece Toilet Series 205AA / 238AA Thank you for selecting American Standard - the benchmark of fine quality for over 100 years. To ensure this product is installed properly, please read these instructions carefully before you begin. (Certain installations may require professional help.) Also be sure your installation conforms to local codes. ! CAUTION: PRODUCT IS FRAGILE.
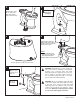
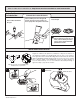
Installation video can be found at: http://www.americanstandard-us.com/vormaxtoilet Before You Start: Turn Off Water Supply If Removing An Existing Toilet Flush to remove water from tank; sponge remaining water from bowl before removing toilet. Clean Flange ! Caution: If leaving floor flange open for more than 1-2 hours, cover flange to prevent escaping sewer gases.
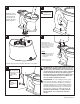
4 ! Apply weight evenly. Do not move after placement. Water tight seal may break. 5 Hand tighten only. Do not overtighten. 6 GASKETS Tighten handles alternately until the tank contacts the front and back of the bowl achieving china-to-china contact. NOTES: a) To ease installation, push down on the top of the tank while tightening handles. b) Tighten all three bolts adequately. Confirm gaskets are fully seated on tank. 7 A Connect water supply line. (Sold separately) Hand tighten nut.
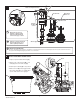
8 Water Level Adjustment Knob Trip Lever Rod Overflow Tube Approximate Water Level Float Cup Adjustable Screw Fill Valve Or Water Control A B C 9 Adjust water level to level indicated on tank by turning water level adjustment knob to move float cup up or down. Prime the system by flushing the product 5 times before use to achieve optimal performance. Water Supply Line PROPER FLUSHING METHOD: Be sure to fully depress the trip lever on each flush.
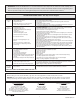
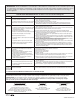
• IMPORTANT: American Standard does not recommend that the tank components be switched out with anything other than the furnished specified components as the performance could be affected. Any alterations made using anything other than the specified components could negatively impact the flush performance and will void the warranty. TROUBLESHOOTING GUIDE - See Step 8-9 For Diagram Problem Possible Cause Does not flush a. Water supply valve closed. b. Supply line blocked. c.
INSTRUCCIONES DE INSTALACIÓN CUIDADO Y MANTENIMIENTO VorMax™ Right Height® Alargado Inodoro De Dos Piezas Serie 205AA / 238AA Gracias por elegir American Standard - el parámetro de primera calidad por más de 100 años. Para asegurarse de que el producto esté instalado correctamente, por favor lea estas instrucciones cuidadosamente antes de comenzar. (Ciertas instalaciones pueden requerir ayuda profesional). Asegúrese de que su instalación cumpla con los códigos locales. ! ADVERTENCIA: EL PRODUCTO ES FRÁGIL.
Mire el video de la instalación en: http://www.americanstandard-us.com/vormaxtoilet Antes De Comenzar La Instalación: Quitando Un Inodoro Existente Cierre el Abastecimiento de Agua Jale la cadena para sacar el agua del tanque; absorba el agua restante con una esponja antes de quitar el excusado. Placa Limpia ! Advertencia : si se deja la brida del piso abierta por más de 1 a 2 horas, cubra la brida para evitar que los gases del alcantarillado penetren en el baño.
3 4 ! Distribuya el peso uniformemente. No lo mueva una vez colocado. El sello apretado del agua puede romperse. 5 Apriete a mano solamente. No apriete de más. 6 JUNTAS Apriete las manijas alternadamente hasta que el tanque haga contacto con el frente y la parte posterior de la taza logrando un contacto cerámica-cerámica. NOTAS: a) Para facilitar la instalación, presione desde arriba el tanque mientras aprieta las manijas. b) Ajuste los tres pernos como corresponde.
8 Perilla De Ajuste Del Nivel Del Agua Barilla de la Manija Tubo De Desagüe Nivel Aproximado De Agua Flotador Tornillo Ajustable Válvula De Llenado O Control De Agua A Ajuste el nivel del agua hasta donde se indica en el tanque girando la perilla de ajuste del nivel del agua para mover el flotador hacia arriba o hacia abajo. B Prepare el sistema por descargue el producto 5 veces antes de usarlo para lograr un rendimiento óptimo.
• IMPORTANTE : American Standard no recomienda que se intercambien los componentes con otros elementos que no sean los componentes especificados y suministrados, ya que podría verse afectado el desempeño. Cualquier modificación que no se realice usando los componentes especificados podría impactar de manera negativa el desempeño de la descarga y anular la garantía. GUÍA DE LOCALIZACIÓN DE FALLAS - Ver El Paso 8-9 Para Consultar El Diagrama Problema No funciona Causa Posible a.
INSTRUCTIONS D'INSTALLATION ENTRETIEN ET NETTOYAGE VorMax™ Right Height® Allongée Toilette Deux Pièces Série 205AA / 238AA Nous vous remercions d'avoir choisi American Standard, synonyme de qualité supérieure depuis plus de 100 ans. Pour s'assurer que ce produit soit bien installé, veuillez lire ces instructions attentivement avant de commencer. (Certaines installations peuvent requérir une aide professionnelle.) Assurez-vous également que votre installation se conforme aux codes locaux.
Une vidéo d'installation peut être visionnée à l'adresse suivante : http://www.americanstandard-us.com/vormaxtoilet. Avant de Commencer : Fermez l’alimentation en eau. Si Vous Enlevez Une Toilette Déjà Installée Tirez la chasse pour vider l’eau du réservoir; épongez l’eau restante de la cuvette avant de retirer la toilette. Nettoyez la bride ! Avertissement : Si la bride au sol demeure ouverte plus de 1 à 2 heures, couvrez-la pour éviter l’échappement de gaz d’égout.
3 4 ! Serrez à la Appliquez du poids uniformément. Ne déplacez pas la toilette après l'avoir mise en place. Le seau étanche risque de briser. 5 main seulement. Ne serrez pas excessivement. 6 JOINTS Serrez les poignées une à la fois jusqu’à ce que le réservoir touche l’avant et l’arrière de la cuvette de façon à obtenir un contact direct. REMARQUES : a) Pour faciliter l’installation, poussez le dessus du réservoir vers le bas en serrant les poignées. b) Serrez convenablement les trois boulons.
8 Bouton de réglage du niveau d’eau Levier de déclenchement Tube de Remplissage Niveau d’eau approximatif Flotteur Vis réglable Robinet de remplissage ou de contrôle de l’eau A Ajustez le niveau d’eau au niveau indiqué sur le réservoir en tournant le bouton de réglage du niveau d’eau pour déplacer le flotteur vers le haut ou vers le bas. B Amorcez le système en tirant la chasse cinq fois avec le produit avant utilisation pour bénéficier de performances optimales.
• IMPORTANTE : American Standard recommande de remplacer les composants par ceux qui ont été spécifiés et fournis à cette fin. D’autres composants peuvent nuire au rendement. Toute modification effectuée à l’aide d’un composant non spécifié peut avoir un impact négatif sur le rendement de chasse et peut annuler la garantie. GUIDE DE DÉPANNAGE - Voir l’étape 8-9 pour le diagramme Problème La chasse ne se tire pas Cause Possible a. Vanne d’alimentation fermée. b. Tuyau d’alimentation bloqué. c.