
Installation Guide

5
6
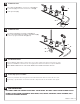
TEST INSTALLED FAUCET
FITTING WITH SPRAY
7
Remove AERATOR. With handles in OFF position, turn on water supplies and check all connections for leaks.
Operate both HANDLES to flush water lines thoroughly. Rotate SPOUT in both directions. Replace AERATOR.
M 9 6 8 7 2 1 R E V. 1. 4
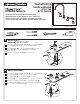
Place SPRAY HOLDER (1) into separate hole of SINK (2) and
assemble NUT (3) onto shank from underside of SINK (2).
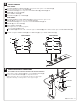
Feed SPRAY HOSE (1) through SPRAY HOLDER (2) and
attach COUPLING NUT (3) of HOSE (1) to HOSE ADAPTOR (4)
on valve body. Tighten COUPLING NUT (3) firmly.
FITTING WITH SPRAY
Hand tighten NUT (3).
1
2
1
3
2
Direct SPRAY HEAD into sink and activate SPRAY. Check HOSE connections for leaks.
3
4
8
Aerator may accumulate dirt causing distorted and reduced water flow. Remove aerator and rinse clean.
If spout drips, operate handles several times from OFF to ON position. Do not force-handles turn only 90˚.
If faucet drips proceed as follows:
9
DO: SIMPLY RINSE THE PRODUCT CLEAN WITH CLEAR WATER. DRY WITH A SOFT COTTON FLANNEL CLOTH.
DO NOT: DO NOT CLEAN THE PRODUCT WITH SOAPS, ACID, POLISH, ABRASIVES, HARSH CLEANERS, OR A
CLOTH WITH A COARSE SURFACE.
CARE INSTRUCTIONS: