
Installation Instructions

- 2 -
2
M965685 Rev. 1.0 (4/16)
3
CONNECT SPRAY HOSE AND INSTALL WEIGHTS
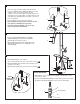
• Turn off hot and cold water supplies before beginning.
• Connect FLEXIBLE SUPPLY HOSES (1, 2) directly to wall
supplies. Connection on tting supplies are 3/8"
compression. Connect left supply hose (Red Stripe) to Hot
wall supply. Connect right supply hose (Blue Stripe) to Cold
wall supply. Use adjustable wrench to tighten connections.
Do not over tighten.
*
Faucet supplies are 35" long from faucet base.
• Note: If additional supply length is required, installer
must purchase additional parts separately.
• Important: If SUPPLY HOSES (1, 2) are too long,
loop as illustrated to avoid kinking.
MAKE WATER SUPPLY CONNECTIONS
1
2
COLD
HOT
7
6
8
2
1
3
4
5
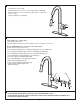
18"
• Push the SPRAY HOSE END (1) into the HOSE
CONNECTOR (2) and slide down the LOCKING
COLLAR (3) until it snaps into place.
• With HAND SPRAY (4) seated in SPOUT (5), install
WEIGHT (6) at labeled area onto HOSE (7), secure
with SCREW (8).
4
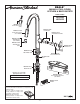
SPRAY OPERATION
• With FAUCET on, press TOGGLE BUTTON (4) on SPRAY (3) to switch
from stream to spray.
• Press and hold PAUSE BUTTON (5) to temporarily stop ow from SPRAY
(3). Release PAUSE BUTTON (5) to resume ow from SPRAY (3).
STREAM (AERATOR)
SPRAY
5
3
4
• Move HANDLE (1) into “off” position.
• Turn on water supplies and check connections for leaks.
• Operate HANDLE (2) up and down, left and right to ush
water lines thoroughly.
• Operate HAND SPRAY and check connections for leaks.
CHECK CONNECTIONS FOR LEAKS
CHECK
CONNECTIONS
FOR LEAKS