
Installation Guide


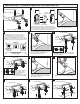


NOTE: Pictures may not exactly depict toilet seat and components.
Thank you for selecting American Standard – the benchmark of fine quality for over 100 years. To ensure
this product is installed properly, please read these instructions carefully before you begin. (Certain
installations may require professional help.) Also be sure your installation conforms to local codes.
TOILET SEAT
INSTALLATION INSTRUCTIONS
7302106-100 Rev. D 7/15
All product names listed herein are trademarks of AS America, Inc. unless otherwise noted.
© AS America, Inc. 2015
SAVE FOR FUTURE USE
Care and Cleaning
When cleaning your toilet seat wash it with a mild, soapy water: rinse the seat thoroughly with clear water and dry with a soft cloth.
Avoid detergents, disinfectants, or cleaning products in aerosol cans. Never use abrasive scouring powders on your seat. Some
bathroom chemicals and cosmetics may damage the seat’s finish. After installation, check the tightness of the bolts from time to
time to ensure a tight fit.
AS AMERICA, INC. ONE YEAR LIMITED WARRANTY
If inspection of this AS America, Inc. (“American Standard”) plumbing product, within one year after its initial purchase, confirms
that it is defective in materials or workmanship, American Standard will repair or, at its option, exchange the product for a similar
model.
This limited warranty applies only to the original purchaser and installation of these products. In the event of a limited warranty
claim, proof of purchase will be required—save sales receipt.
This limited warranty does not apply to local building code compliance. Since local building codes vary considerably, the purchaser
of this product should check with a local building or plumbing contractor to insure local code compliance before installation.
This limited warranty is void if the product has been moved from its initial place of installation; if it has been subjected to faulty
maintenance, abuse, misuse, accident or other damages; if it was not installed in accordance with American Standard's
instructions; or if it has been modified in a manner inconsistent with the product as shipped by American Standard.
American Standard's option to repair or exchange the product under this limited warranty does not cover any labor or other costs
of removal or installation. IN NO EVENT WILL AMERICAN STANDARD BE LIABLE FOR THE COST OF REPAIR OR
REPLACEMENT OF ANY INSTALLATION MATERIALS, INCLUDING BUT NOT LIMITED TO, TILES, MARBLE, ETC. American
Standard will not be responsible for any other incidental or consequential damages attributable to a product defect or to the repair
or exchange of a defective product, all of which are expressly excluded from this limited warranty. This limited warranty does not
cover any liability for consequential or incidental damages, all of which are hereby expressly disclaimed, or the extension beyond
the duration of this limited warranty of any implied limited warranties, including those of merchantability or fitness for an intended
purpose. (Some states or provinces do not allow the exclusion or limitation of implied limited warranties, so this exclusion may not
apply to you.)
This limited warranty gives you specific legal rights. You may have other statutory rights that vary from state to state or from
province to province, in which case this limited warranty does not affect such statutory rights.
In the United States:
American Standard Brands
P.O. Box 6820
Piscataway, New Jersey 08855
Attention: Director of Customer Care
For residents of the United States, warranty
information may also be obtained by calling
the following toll free number: (800) 442-1902
www.americanstandard.com
In Canada:
AS Canada, ULC
5900 Avebury Rd.
Mississauga, Ontario
Canada L5R 3M3
Toll Free: (800) 387-0369
www.americanstandard.ca
In Mexico:
American Standard B&K Mexico
S. de R.L. de C.V.
Via Morelos #330
Col. Santa Clara
Ecatepec 55540 Edo. Mexico
Toll Free: 01-800-839-1200
www.americanstandard.com.mx
IF
YOU
HAVE...
Bottom Mount w/ Posts
for Metal Hinges
See Installation 4
on page 4
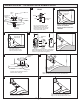
Bottom Mount with
Zip Nuts
See Installation 3
on page 3
Top Mount
See Installation 2
on page 2
Bottom Mount
See Installation 1
on page 1