
Installation Guide


1
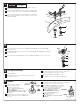
Apply a bead of PUTTY along the edge of the underside of the body.
Insert FAUCET SHANKS (1) through holes in sink.
Assemble LOCKNUTS (2) from underside of SINK. Align BODY as far
forward as possible and secure position by tightening LOCKNUTS (2).
Connect the HOT water supply to the left SHANK and the COLD water
supply to the right SHANK using sealant, appropriate connectors, and
COUPLING NUTS (3).
BODY
PUTTY
SINK
HOT
COLD
60184 Rev. 1.5 (11/15)
Turn off water at
main supply.
CAUTION
SERVICE
4
3
CARTRIDGE
SCREEN
TEST INSTALLED FAUCET
3
Remove AERATOR.
With handle in OFF position, turn on water supplies and check
all connections for leaks.
Operate both handles to flush water lines thoroughly. Check
spout mounting and hose connections for leaks.
Operate LIFT ROD and check DRAIN for leaks.
Turn handles into OFF position and replace AERATOR.
To change direction of handle
rotation, proceed as follows:
Turn valve to OFF position.
Remove HANDLE and BONNET NUT.
Remove SPRING CLIP.
Lift STOP WASHER, turn 90° and replace.
Replace SPRING CLIP.
Replace BONNET NUT, HANDLE, SCREW,
and INDEX.
AERATOR may accumulate dirt causing distorted
and reduced water flow. Remove AERATOR and
rinse clean.
If spout drips, operate handles several times from OFF to ON
position. Do not force - handles turn only 90°.
Plastic SCREEN in CARTRIDGE may accumulate
dirt causing reduced water flow. To clean, first
turn off hot and cold water supplies, then:
Remove HANDLE and BONNET NUT.
Remove CARTRIDGE by pulling up.
Thoroughly rinse plastic SCREEN at
base of CARTRIDGE.
Replace CARTRIDGE until flange is
tight against valve body.
Turn valves OFF.
Replace BONNET NUT, HANDLE, SCREW
and INDEX.
SPRING
CLIP
STOP
WASHER
90°
Apply a bead of PUTTY around underside of DRAIN PLUG FLANGE (1). Insert DRAIN PLUG (2)
into SINK drain hole.
Hold DRAIN PLUG (2) to prevent turning and assemble GASKET (3), WASHER (4) and LOCKNUT (5)
from underneath sink.
Insert threaded end of TAILPIECE (6) into lower end of DRAIN PLUG (2). Connect other end to trap.
GRID DRAIN ASSEMBLY (Model 5502 only)
1
2
PUTTY
SINK
1
2
3
4
5
2
3
2