
Instructions / Assembly


755438-100 Rev. B 4/18
2
1
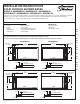
Ensure that the floor and stud walls are square and plumb on a level
floor as shown in Figure A. Provide a 6" x 6" (152 x 152mm) opening in
the floor for the drain and refer to the product chart for actual drain
location. The lower portion of the drain mount must fit into the 6"x 6"
(152 x 152mm) opening. Check by dry fitting the shower base in the
final location. Draw a line 3" (76mm) above the level subfloor on the
wall studs at each side of the opening.
FIGURE A
90°
90°
2" (51mm)
PVC Waste Pipe
6" x 6"
(152 x 152mm)
Opening
C/L
(See Product Chart for Drain Location)
MARK STUDS 3" ABOVE LEVEL SUBFLOOR
NOTE: Shower pans are to be installed on sub-oors not nished oors. Shower
pans will drain properly provided they are installed on a level surface.
Check the floor with a long level. A long level is more likely to detect level of
sub-floor at its greatest dimensions. Check front-to-back at the left and right sides
and at the center. Repeat for side-to-side dimensions. Finally check the diagonals.
Depending on the results, some additional prep work may be necessary.
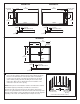
6036SMRHOL6036SMLHOL
FRONT
TOP VIEW
60"
(1524mm)
4-9/16"
(116mm)
RIGHT SIDE
2"
(51mm)
1"
(25mm)
2" (51mm)
THRESHOLD DEPTH
36"
(914mm)
17-3/4"
(451mm)
LEFT HAND
OUTLET
36"
(914mm)
4-9/16"
(116mm)
60"
(1524mm)
RIGHT SIDE
2"
(51mm)
1"
(25mm)
2" (51mm)
THRESHOLD DEPTH
TOP VIEW
FRONT
17-3/4"
(451mm)
RIGHT HAND
OUTLET
4836SMCOL
FRONT
TOP VIEW
CENTER
OUTLET
48"
(1219mm)
24"
(610mm)
36"
(914mm)
17-3/4"
(451mm)
RIGHT SIDE
2"
(51mm)
1"
(25mm)
2" (51mm)
THRESHOLD DEPTH