
Installation Guide

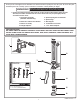


RECOMMENDED TOOLS; Fig. 2
Fig. 2
1.
2.
3.
4.
5.
Flat Blade Screwdriver
Smooth Jaw Adjustable Wrench
Tape Measure
Tubing Cutter
File
1
2
3
4
5
PRIOR TO INSTALLATION
• Flush all water lines prior to operation.
• DO NOT use pipe sealant or plumbing grease on any coupling!
• Protect the chrome or special finish on the Bedpan Washer.
DO NOT USE toothed tools on finished surfaces to install or
service these valves. Also see “Care and Cleaning” section of
this manual.
IMPORTANT:
• All plumbing must be installed in accordance with
applicable codes and regulations.
• Water supply lines must be sized to provide an
adequate volume of water for each fixture.
• Water pressure over 80 psi is not recommended
with most plumbing fixtures
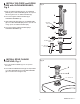
2
Fig. 1
Roughing-in Dimensions
GENERAL DESCRIPTION:
10'
FLUSH VALVE with BEDPAN WASHER
M965403 REV. 1.1
For Use with Exposed Flushometer
and 1-1/2" Top Spud Toilets
38mm (1-1/2")
OFF-SET
TAI LPI E CE
FOR 1-1/2" TOP
SPUD FIXTURES
ADJUSTABLE
245mm
(9-5/8")
MAX.
619mm
(24-3/8")
708mm
(27-7/8")
358mm
(14-1/16")
222mm
(8-3/4")
FINISHED WALL
SUPPLY
DN 25mm
(1" I.P.S.)
FINISHED WALL
108mm-133mm
(4-1/4" to 5-1/4")
ADJUSTABLE
207mm
(8-1/8")
MAX.
322mm
(12-11/16")
90˚