
Installation Guide


Note: SKU 7020105 only has one supply hose for connecting
to the cold water supply or an external mixing valve.
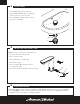
• Ensure that lter screen (1) is properly seated in the hose
nut of each supply line.
• Connect exible supply hoses directly to wall supplies.
Connection on tting supplies are 3/8" compression.
Connect the supply hose with the red label to the Hot wall
supply. Connect the supply hose with the blue label to the
Cold wall supply. Use an adjustable wrench to tighten
connections. Do not over tighten.
*
Faucet supplies are 24" long from faucet base.
• Note: If additional supply length is required, installer
must purchase additional parts separately.
• Important: If supply hoses are too long, loop as
illustrated to avoid kinking.
1
COLD
HOT
Red
Blue
1
2
MAKE WATER SUPPLY CONNECTIONS
C
3
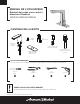
INSTALL BATTERY PACK
• Secure the MOUNTING BRACKET (2) with the
provided ANCHORS (3) and SCREWS (1) below
the counter top.
Note: 1/4" drill bit can be used for drywall anchor
pilot holes.
Note: Ensure that the location of the MOUNTING
BRACKET (2) is close enough to the faucet so
that the POWER SUPPLY WIRE (7) can reach the
battery pack.
• Insert the BATTERY (5) in to the BATTERY
PACK (4) and push the LID (6) on to the
BATTERY BACK (4).
• Connect the POWER SUPPLY WIRE (7) to the
LID (6).
• Secure the BATTERY PACK (4) on to the
MOUNTING BRACKET (2).
• Remove protective lm from sensor eye when
installation is complete.
Turn off hot and cold water
supplies before beginning.
321
7
6
5
4
D