
Installation Guide

- 2 -
M965988 (10/18)
2
3
4
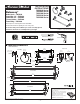
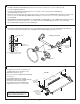
INSTALL WALL BRACKET
INSTALL ACCESSORY
INSTALL TOWEL BAR
• The WALL MOUNTED ACCESSORIES (1) works best if secured to a wall stud or cross brace within the wall,
using the SCREWS (2) supplied.
• If the WALL MOUNTED ACCESSORIES (1) are to be installed on a tile or plaster wall the ANCHORS (4)
and SCREWS (2) should be used.
• Determine desired height and location (optional) and mark a center line. Using the MOUNTING PLATE (3) as a template mark
the two spots for the ANCHORS (4). If MOUNTING PLATE (3) is secured to a stud or cross brace drill small pilot holes
for SCREWS (2).
• For installations on drywall or tiled walls: Use ANCHORS (4) and SCREWS (2) for securing MOUNTING PLATE (3) to nished
wall. Drill two 1/4" dia. holes a minimum of 1-3/4" deep. Insert the two ANCHORS (4) ush with face of the nished wall.
• Secure MOUNTING PLATE (3) to wall with SCREWS (2).
• Install WALL MOUNTED ACCESSORY (1) onto installed MOUNTING PLATE (3). Push WALL MOUNTED ACCESSORY (1)
ush against nished wall and tighten SET SCREW (5) with HEX WRENCH (6) supplied with accessory.
• See detail for the center to center dimension
of TOWEL BARS (1). For installation of the
MOUNTING PLATE see step 1.
• Note: The center line of MOUNTING PLATES (3)
must be level.
• Install TOWEL BAR (1) onto installed
MOUNTING PLATES (3). Push TOWEL BAR (1)
ush against nished wall and tighten
SET SCREWS (5) with HEX WRENCH (6)
supplied with accessory to secure to wall.
*FROM CENTER TO CENTER OF WALL BRACKETS
* NOTE: MEASURMENT IS APPROXIMATE ONLY,
PLEASE USE BAR AS TEMPLATE FOR ACTUAL
CENTER TO CENTER MEASUREMENTS.
Towel Ring
Robe Hook
Pivoting Tissue Holder
Note: Installation is typical for all
wall mounted accessories.
OPTIONAL TO
FINISHED FLOOR
C/L
3
4
2
FINISHED WALL
5
6
USE MOUNTING
PLATE AS
TEMPLATE
2
3
4
1
Towel Bar
*23-5/8"
(600mm)
USE
MOUNTING
PLATE AS
TEMPLATE
OPTIONAL TO
FINISHED FLOOR
(50" TO 60")
(1270mm TO
1524mm)
LEVEL
C/L
2
1
3
4
C/L
5
6