
Installation Guide

- 2 -
M965993 (10/18)
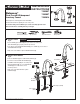
HOT
COLD
1
3
3a
4
2
Blue Stripe
(C0LD)
Red Stripe (HOT)
“P” TRAP
WASTE
OUTLET
• Connect FLEXIBLE SUPPLIES (1, 2) directly to wall supplies.
Connection on tting supplies are 3/8" compression.
Connect FLEXIBLE SUPPLY (1) (Marked with a Red Band) to the
Left wall supply and FLEXIBLE SUPPLY (2) (Marked with a Blue
Band) to Right wall supply.
• Connect the VALVE HOSES (3, 3a) to SPOUT TEE (4).
Use adjustable wrench to tighten connections.
Do not over tighten.
• Faucet supplies are 20" long from faucet base.
Note: If additional supply length is required, installer must
purchase additional parts separately.
Important: If SUPPLY HOSES (1, 2) are to long, loop as
illustrated to avoid kinking.
• Connect 1-1/4" O.D. tail piece on POP-UP DRAIN to
waste outlet.
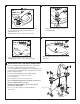
4 5
6
FLANGE GASKET AND POP-UP KNOB CHECK OPERATION OF POP-UP
• Check DRAIN FLANGE in SINK to ensure that
FOAM GASKET is fully compressed and not visible.
FOAM
GASKET
NOT VISIBLE
DRAIN
FLANGE
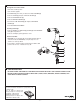
2 3
INSTALL DRAIN FROM BELOW FIXTURE
• Install DRAIN (1) by dropping it from the top of the sink.
• From under side of SINK install GASKET (2) and
MOUNTING NUT (3).
Note: Plumber’s putty or caulk is recommended.
• Thread TAIL PIECE NUT (1) clockwise onto
DRAIN BODY (2).
DRAIN
OUTLET
REAR OF SINK
1
2
3
1
2
1
• Operate DRAIN STOPPER (1) to verify that it opens
and closes.
MAKE WATER SUPPLY AND WASTE CONNECTIONS