
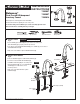
Installation Guide

- 3 -
7
M965993 (10/18)
SERVICE
CARE INSTRUCTIONS:
DO: SIMPLY RINSE THE PRODUCT CLEAN WITH CLEAR WATER. DRY WITH A SOFT COTTON FLANNEL CLOTH.
DO NOT: DO NOT CLEAN THE PRODUCT WITH SOAPS, ACID, POLISH, ABRASIVES, HARSH CLEANERS, OR A
CLOTH WITH A COARSE SURFACE.
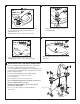
90˚
90˚
2
6
3
1
4
5
8
7
5
Change Direction of the Handle
• Turn valves to OFF position.
• Turn off water supplies.
• Pull HANDLE (1) “UP” rmly to release from ESCUTCHEON (6).
• Remove SCREW (3) and pull off PLASTIC INSERT (2).
• Remove CARTRIDGE NUT (8).
• Remove RETAINING O-RING (4).
• Lift and turn STOP WASHER (5) 90˚. Replace RETAINING
O-RING (4).
• Re-install HANDLE ASSEMBLY.
To Change Cartridge:
• Remove HANDLE (1), ADAPTER (2), SCREW (3) and CARTRIDGE
NUT (8) via steps above.
• Remove cartridge by pulling upward on stem.
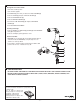
Aerator Clean Out
• AERATOR may accumulate dirt causing distorted and reduced
water ow. Remove AERATOR by using the edge of a coin
and rinse to clear any debris.
• If spout drips, operate handles several times from OFF to ON
position. Do not force - handles turn only 90˚.
8
HOT LINE FOR HELP
For toll-free information and answers to your questions, call:
1 (800) 442-1902
Mon. - Fri. 8:00 a.m. to 8:00 p.m. EST
Saturday 10:00 a.m. to 4:00 p.m. EST
IN CANADA 1-800-387-0369
(TORONTO 1-905-306-1093)
Weekdays 8:00 a.m. to 7:00 p.m. EST
IN MEXICO 01-800-839-1200