
Installation & Assembly


TOOLS REQUIRED; Fig. 2
Fig. 2
1 Hex Wrench (Included)
2 Adjustable Wrench
3 Plumbers' Putty or Caulking
4 Phillips Screwdriver
5 Tape Measure
1
2
3
4
5
INSTALL SPOUT ASSEMBLY;
Fig. 1
INSTALLATION
CAUTION
Turn off hot and cold water
supplies before beginning
2
10'
1
CONNECT POWER SUPPLY; Fig. 1a
(7056 series only)
2
Fig. 1
457mm
(18)
3/8" COMPRESSION
CONNECTORS
MIN. 1" CLEARANCE
165mm
(6-1/2)
32mm (1-1/4)
66mm
( 2-5/8)
38mm
(1-1/2 )
140mm
(5-1/2)
191mm
(7-1/2)
191mm
(7-1/2)
MOUNTING
SURFACE
FINISHED WALL
OR BACKSPLASH
Roughing-in Dimensions
GENERAL DESCRIPTION:
Electronic faucet with proximity operation. Vandal
resistant solid brass construction single post mounting.
Operates on DC (battery) or AC power. Inlets 3/8"
compression, built-in checks, flexible stainless steel 18"
reach inlet hoses for spout connection and In-line
integral strainer for solenoid.
Fig. 1
Fig. 1a
1
9
3
2
4
5
6
2
3
1
8
7
M965255 REV. 1.6
PUTTY
(If required)
ELECTRICAL OUTLET
(120V 50/60 Hz)
IMPORTANT: Do not
use putty when installing
faucet without escutcheon.
10
MOUNTING
SURFACE
(OPTIONAL)
TIGHTEN
SPIN NUTS
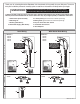
1. Make sure O-RING SEAL (9) is installed.
2. Installation with ESCUTCHEON (1) (optional). Apply a
bead of putty to bottom edge of ESCUTCHEON with PUTTY
PLATE (1). (Only if mounting surface is uneven).
3. Insert supply HOSES (2), SHANK (3) and POWER CORD
(10) (if equipped) through hole in ESCUTCHEON with PUTTY
PLATE (1) and mounting surface. Follow mounting
instructions below to secure faucet to mounting surface.
(Make sure PIN (7) is in back).
4. Installation less ESCUTCHEON (1). IMPORTANT: Do not
use putty when installing faucet without escutcheon.
5. Assemble RUBBER WASHER (4), BRASS WASHER
(5) and THREADED LOCKNUT (6) onto SHANK (3) from
underside of sink or mounting surface. Hand tighten
LOCKNUT (6).
6. Use a screwdriver to tighten SCREWS (8) on
LOCKNUT (6). Work your way around LOCKNUT (6),
tightening the screws slightly each time until all are snug
to ensure even pressure.
1. Connect the sensor cable (1) to the POWER SUPPLY
CABLE (2).
2. Code approved Electrical Outlet provided by others.
(120V 50/60 Hz)
3. Plug AC POWER SUPPLY (3) into Outlet.