
Installation Guide

- 3 -
6
7
DO: CLEAN WITH CLEAR WATER. DRY WITH A SOFT COTTON FLANNEL CLOTH.
DO NOT: DO NOT CLEAN THE PRODUCT WITH SOAPS, ACID, POLISH, ABRASIVES, HARSH CLEANERS, OR A
CLOTH WITH A COARSE SURFACE.
CARE INSTRUCTIONS:
5
M965767 Rev. 1.2 (1/20)
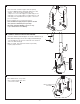
SPRAY OPERATION
• With FAUCET on press TOGGLE
BUTTON (4) on SPRAY (3) to
switch from stream to spray.
• Press and hold PAUSE BUTTON (5)
to temporarily stop ow from
SPRAY (3). Release PAUSE
BUTTON (5) to resume ow
fromSPRAY (3).
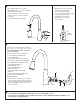
SERVICE
If faucet drips, operate HANDLE several times
from “off” to “on.” Do not apply excessive force.
Clogged CARTRIDGE outlets or inlets may
cause reduced ow.
To clean, rst turn off water supply then:
• Loosen HANDLE SCREW (1) and
remove HANDLE (2).
• Unthread the ESCUTCHEON CAP (3).
Unthread three MOUNTING SCREWS (4).
• Lift CARTRIDGE (5) off MANIFOLD (6).
• Clean MANIFOLD (6) and
CARTRIDGE (5) ports.
• Place CARTRIDGE (5) onto
MANIFOLD (6) and
tighten MOUNTING SCREWS (4)
alternately.
• Replace SNAP RING (3), HANDLE (2),
tighten HANDLE SCREW (1).
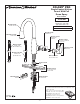
For Reduced Flow:
• FLOW CONTROL DEVICE may accumulate
dirt causing distorted and reduced water ow.
To service FLOW CONTROL DEVICE unthread
SPRAY ASSEMBLY and rinse clean FLOW
CONTROL DEVICE.
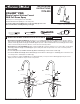
TEST INSTALLED FAUCET
• Move HANDLE (1) into “off” position.
• With HANDLE (1) in “off” position, unthread
SPRAY (3) from HOSE (2).
• Operate handle back to front, in COLD
and HOT positions, to ush water lines
thoroughly.
• Replace SPRAY (3) onto HOSE (2).
STREAM
(AERATOR)
SPRAY
5
3
4
1
3
2
REMOVE
COLD
ON
OFF
HOT
1
2
3
4
5
6