
Installation Instructions


- 3 -
M965764 (8/16)
6
7
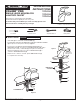
• With HANDLE (1) in OFF position, turn on WATER
SUPPLIES (2) and check all connections for leaks.
• Remove AERATOR (3).
• Operate HANDLE (1) to ush water lines thoroughly.
• Replace AERATOR (3).
CHECK DRAIN CONNECTIONS
• Operate POP-UP KNOB (4) and ll lavatory with water.
Check that DRAIN STOPPER (5) makes a good seal
and retains water in Sink.
• Release POP-UP KNOB (4) down and check all drain
connections and “P” trap for leaks. Tighten
if necessary.
• To remove or replace cartridge:
– Turn valve to OFF position.
– Pull out PLUG BUTTON (1) and remove HANDLE SCREW (2).
– Pull off HANDLE (3) and CAP (4).
– Pull out CARTRIDGE (5).
– Inspect CARTRIDGE (5) and O-RINGS (6) for debris and
clean if necessary.
– Clean MANIFOLD (7) and rinse clean.
– Reinstall CARTRIDGE (5) and O-RINGS (6) onto
MANIFOLD (7).
– Reinstall CAP (4) and HANDLE ASSEMBLY (3).
• If spout drips, operate handle several times from OFF to ON
and HOT to COLD position. Do not force - handle turns only 90˚.
ADJUST HOT LIMIT SAFETY STOP
By restricting HANDLE rotation and limiting the amount of
hot water allowed to mix with the cold, the HOT LIMIT SAFETY
STOP (8) reduces risk of accidental scalding. To lower the
maximum hot water temperature of your faucet, all you need to
do is adjust the setting on the HOT LIMIT SAFETY STOP (8).
Note: The HOT LIMIT SAFETY STOP (98 is set at the neutral
setting from the factory. Fig. A.
• To adjust HOT LIMIT SAFETY STOP:
– Remove HANDLE ASSEMBLY (3), CAP (4)
– Set the CARTRIDGE STEM (9) to the OFF position.
– Lift up the HOT LIMIT SAFETY STOP 8).
– Place the HOT LIMIT SAFETY STOP (8) in the desired GRAY
SHADED AREA (10) to limit the hot water. Fig. B.
– Reinstall CAP (4) and HANDLE ASSEMBLY (3).
SERVICE
CARE INSTRUCTIONS:
DO: SIMPLY RINSE THE PRODUCT CLEAN WITH CLEAR WATER. DRY WITH A SOFT COTTON FLANNEL CLOTH.
DO NOT: DO NOT CLEAN THE PRODUCT WITH SOAPS, ACID, POLISH, ABRASIVES, HARSH CLEANERS, OR A
CLOTH WITH A COARSE SURFACE.
TEST INSTALLED FITTING
5
1
4
3
OFF
ON
HOT
COLD
“P” TRAP
WASTE
OUTLET
2
2
CAUTION
Turn off hot and cold water
supplies before beginning.
7
4
5
6
9
8
1
2
2.5mm HEX KEY
3
+HOTTER
COLDER
8
9
A
B
10
SETTING
MARKS