
Installation Guide

- 3 -
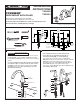
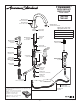
HANDSHOWER INSTALLATION (FOR MODEL 7430.901 ONLY)
6
M965723 Rev. 1.1 (7/16)
5
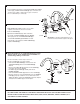
SERVICE
• To change direction of handle rotation, proceed as follows:
– Turn valve to OFF position.
– Thread counter-clock wise HANDLE BASE (1) to remove
HANDLE ASSEMBLY (2) from ESCUTCHEON BASE (3).
– Use a at blade screw driver to remove SPRING CLIP (4).
– Lift STOP WASHER (5), turn 90˚ and replace.
– Replace SPRING CLIP (4).
– Reinstall HANDLE ASSEMBLY (2).
• If spout drips, operate handles several times from OFF to ON
position. Do not force - handles turn only 90˚.
90˚
1
5
3
4
2
When not in use, HAND SHOWER should be
seated in the HOLDER.
NOTE
• Drop SPRAY ESCUTCHEON (1) through the fourth hole of the tub ledge (12" max from
SPOUT center) with SPRAY ESCUTCHEON (1) directed towards tub center. Be sure
RUBBER RING (2) is properly seated in ESCUTCHEON (1). Install RUBBER WASHER
(3) and LOCKNUT (4) from underside of ledge.
• Secure SPRAY ESCUTCHEON (1) by tightening LOCKNUT (4).
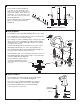
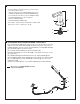
• Add SEAL WASHER (5) and connect HOSE (10) to outlet nipple at the bottom of TEE
(7). Tighten rmly.
• Slip SHOWER HOSE (8) with COUPLING NUT through SPRAY HOLDER (6) and
ESCUTCHEON (1). (Note: SPRAY HOLDER (6) must be separate from ESCUTCHEON
(1) to get HOSE (8) through ESCUTCHEON (1).) Install SEAL (9) and connect both
HOSES (8) and (10).
INSTALL second SEAL (9) and connect HAND SHOWER (11) to SPRAY HOSE (8).
1
2
3
4
5
7
8
10
9
9
6