
Installation Guide

- 4 -
M965723 Rev. 1.1 (7/16)
7
8
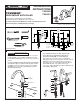
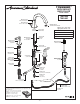
• Connect HOT water supply to LEFT INLET UNION (1) and COLD
water supply to RIGHT INLET UNION (2). Pipe connections are
3/4" NPT. Use sealant or Teon tape on pipe connections.
Do not solder directly to valve body.
MAKE WATER SUPPLY CONNECTIONS
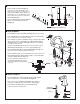
Before the bathroom is completely finished, you may
want to remove spout, handshower, and handles to
avoid damage during construction.
7A
• With HANDLES (3) in OFF position, turn on water
supplies and check all connections for leaks.
• Remove AERATOR (4).
• Operate both HANDLES (3) to ush water lines
thoroughly. Lift HAND SHOWER (7) from HOLDER,
direct spray into tub. Lift TRANSFER KNOB (8) to
check HAND SHOWER (7) and HOSES for leaks.
• Turn handles “off” and replace HAND SHOWER (7).
Replace AERATOR (4).
TEST INSTALLED FAUCET
3/4" X 3/4" NPT UNION
(NOT SUPPLIED)
HOT
COLD
3/4" NPT
3/4" NPT
7
1
8
3
4
2
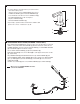
IMPORTANT: It is strongly recommended that access be
provided for all enclosed mechanical parts to this system.
CARE INSTRUCTIONS:
DO: SIMPLY RINSE THE PRODUCT CLEAN WITH CLEAR WATER. DRY WITH A SOFT COTTON FLANNEL CLOTH.
DO NOT: DO NOT CLEAN THE PRODUCT WITH SOAPS, ACID, POLISH, ABRASIVES, HARSH CLEANERS, OR A
CLOTH WITH A COARSE SURFACE.
Hex wench
(supplied)
1
8
8
3
4
6
5
7
VIEW "A"
VIEW "A"
2
FIG. 1
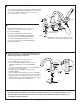
• To remove handles, reverse steps in section 4.
• To remove SPOUT (1), proceed as follows:
– Unthread LIFT ROD KNOB (2) to release it from the
TRANSFER ROD (8). Remove LIFT ROD KNOB (2).
VIEW A.
– Remove PLUG BUTTON (3) and remove SET SCREW (4)
using 5mm hex wrench supplied.
– Lift SPOUT (1) off SHANK (5) carefully and remove
RUBBER RING (6).
– Unthread SHANK SLEEVE (7) and remove from SHANK (5).
– Reverse sequence to re-install SPOUT (1). Be sure RUBBER
RING (6) is properly seated in its recess at the base of the
SPOUT (1). Make certain SET SCREW (4) is properly aligned
and tight so that SPOUT (1) is locked in place.