
Installation Guide


INSTALLATION INSTRUCTIONS
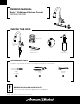
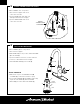
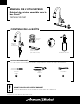
1 1A
• Apply a bead of putty to bottom edge of
ESCUTCHEON with PUTTY PLATE (1).
Make certain the SEAL (9) is properly seated in
recess of faucet body. Insert SUPPLY HOSES (2),
SPRAY HOSE (7) and SHANK (3) through hole of
ESCUTCHEON with PUTTY PLATE (1) and
mounting surface. Follow mounting instructions
below to secure faucet to mounting surface.
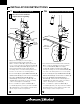
• Insert HOSES (2) through RUBBER WASHER (4),
BRASS WASHER (5), and threaded LOCKNUT (6).
• Assemble RUBBER WASHER (4), BRASS
WASHER (5), and threaded LOCKNUT (6) onto
SHANK (3) from underside of sink or mounting
surface. Hand tighten LOCKNUT (6).
• Use a screwdriver to tighten SCREWS (8) on
LOCKNUT (6). Work your way around LOCKNUT
(6), tightening the screws slightly each time until
all are snug to ensure even pressure.
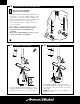
INSTALL WITH ESCUTCHEON
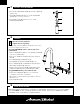
INSTALL WITHOUT ESCUTCHEON
A A
Turn off hot and cold water
supplies before beginning.
SINK OR
MOUNTING
SURFACE
7
PUTTY
2
3
4
5
8
6
7
FAUCET BASE
1
9
4
5
8
7
6
9
10
3
2
SINK OR
MOUNTING
SURFACE
7
• Discard ESCUTCHEON with PUTTY PLATE (1)
Make certain the SEAL (9) is properly seated in
recess of RING BASE (10). Insert supply
HOSES (2), SPRAY HOSE (7) and SHANK (3)
through mounting hole and seat RING BASE (10)
onto sink or mounting surface. Do not use putty.
• Insert HOSES (2) through RUBBER WASHER (4),
BRASS WASHER (5), and threaded LOCKNUT (6).
• Assemble RUBBER WASHER (4), BRASS
WASHER (5), and threaded LOCKNUT (6) onto
SHANK (3) from underside of sink or mounting
surface. Hand tighten LOCKNUT (6).
• Use a screwdriver to tighten SCREWS (8) on
LOCKNUT (6). Work your way around LOCKNUT
(6), tightening the screws slightly each time until
all are snug to ensure even pressure.