
Installation Guide


9
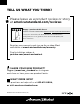
CARE INSTRUCTIONS
DO: SIMPLY RINSE THE PRODUCT CLEAN WITH CLEAR WATER. DRY WITH A SOFT COTTON FLANNEL
CLOTH. DO NOT: DO NOT CLEAN THE PRODUCT WITH SOAPS, ACID, POLISH, ABRASIVES, HARSH
CLEANERS, OR A CLOTH WITH A COARSE SURFACE.
7
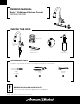
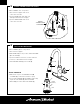
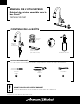
INSTALL SOAP DISPENSER
1
2
3
4
• Insert SOAP DISPENSER SHANK (1) through O-RING (2)
and the deck.
• Thread MOUNTING NUT (3) on to SOAP DISPENSER
SHANK (1) to secure it to the deck.
• Fill SOAP BOTTLE (4) and thread it on to SOAP
DISPENSER SHANK (1).
8
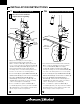
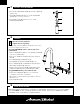
SERVICE
1
2
4
3
5
6
7
8
If faucet drips, operate HANDLE several times from “off” to
“on.” Do not apply excessive force.
Clogged CARTRIDGE outlets or inlets may cause
reduced flow.
• Remove INDEX BUTTON (1), loosen HANDLE SCREW (2)
and remove HANDLE (3).
• Remove the HANDLE CAP (4). Unthread the PLASTIC
NUT (5).
• Lift CARTRIDGE (6) off MANIFOLD (7).
• Clean MANIFOLD (7) and CARTRIDGE (6) ports.
• Place CARTRIDGE (6) onto MANIFOLD (7) and tighten
MOUNTING SCREWS (5) alternately.
• Replace ESCUTCHEON CAP (4), HANDLE (3), tighten
HANDLE SCREW (2) and install INDEX BUTTON (1).
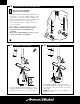
Clogged AERATOR may cause reduced flow:
• Unthread the AERATOR (8) with a coin or flat head
screwdriver and clean it of any debris.
• Allow water to run through the faucet with no aerator to
flush the hoses.
• Reinstall AERATOR (8).
Turn off hot and cold water
supplies before beginning.