
Installation Guide


791640-100- 2 -
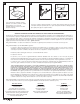
A
B
Single Bowl
Double Bowl
Tra p
Tra p
Connect drain assembly hand tight to check alignment. It may be
necessary to cut off part of the tailpiece (area "A") or part of the
horizontal leg of the trap (area "B").
Secure joint for watertight assembly.
8
7
Connect supply lines to faucet finger tight, and
carefully bend to engage with the supply stops.
Tighten connections to faucet for secure seal.
A. Carefully lower sink into cutout. Make sure the sink is in the proper
location and press down firmly.
WARNING: Improper tightening of screws could result in
improper installation or cause damage to the sink.
B. Loosen the screw and turn the clamp 90 degrees so the clamp can
catch the bottom of countertop as shown. Hand tighten the screws.
C. Recheck sink position on countertop. Tighten all screws an
additional 1/4 turn with a flat head screwdriver.
WARNING: DO NOT OVERTIGHTEN
6
!
!
FOR DROP-IN SINK INSTALLATION
CHECK THE CUTOUT DIMENSIONS
2
Check the countertop cutout opening by placing the sink in the opening to be sure it is sized properly. The rim of the sink
must be set uniformly on the countertop to ensure the corners of the sink seat properly. If the sink does not fit adjust the
cutout opening using the saber saw.
PREPARING THE COUNTERTOP
1
Make sure there are no obstructions such as cabinets,
plumbing, etc. below or above the countertop.
Place template on countertop checking to make sure
the sink will line up correctly with plumbing.
To begin the cutout for the sink, drill a hole then use a
sabersaw to carefully cut along the template.
Perimeter
of sink
Cutout
Perimeter
of sink
Cutout
4
Apply a generous portion of sealant inside line traced on countertop.
Assemble the screw with the clamp as shown (1).
Slide the screw and clamp assembly under the open end of
the U Channel as the location on the template suggests.
Turn the clamp in the same direction as the U Channel and
hand tighten the screw as shown (2).
5
Screw
Screw
Screwdriver
U Channel
U Channel
Clamp Clamp
Clamp
(1) (2)
NOTE: Your sink may not come with the strainer and faucet
assembly in which case you will need to purchase separately
and follow instructions included with the purchased products.
PREPARING THE STRAINER AND FAUCET ASSEMBLY
Install the strainer as shown.
Install the faucet following the instructions included with the faucet.
3
Bottom of sink
Below sink
Slide Screw with
Clamp into U Channel
COUNTERTOP
SINK