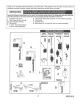
ELECTRICAL INSTALLATION Product Page PW Power Kit (PRODUCER) 4 Plugin AC Po war Kit (FRONTENAC) 5 Hard-Wired AC Power Kit (PROZAC) 5 Multi-AC Power Kit (PKOO.MAC) 5 Important: All product with standard battery come with theatricals connections preambled af the factory. No further action necessary. PW 10 YEAR BATTERY SYSTEM; Fig. 1 PWRI™ VERSION; 1, Connect PW BATTERY PACK {1} to SENSOR CABLE 2). 2.
AVERSIONS (HARD-WIRED / PLUG-IN POWER SUPPLY); Fig. 2 important: Turn off power to outlet or control box. 1. Nicotine PLUG-IN AC POWER SUPPLY (8) or 10" EXTENSION CABLE {2 if using HARD-WIRED AC TRANSFORMER (7) lo SINGLE AC ADAPTER (3). 2. Connect SENSOR CABLE (4) to the other terminal of the SINGLE AC ADAPTER (3). 3. Connect PLUG-IN AG POWER SUPPLY (5} to wall outset, or connect other end of 10 EXTENSION CABLE (3Y1o the HARD-WIRED AC TRANSFORMER (7).
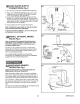
-] REPLACE BATTERY; Fig. 5,7 1. Remove COVER SCREW (1) and 1t COVER (18} off, 2. Disconnect SENSOR CABLES (8) and (7) from the BATTERY and SOLENOID VALVE. (Fig. 7) 3. Push BATTERY (17) forward and Pull it out. (Fig, §) 4. Replace:the new battery with the same placement. {neat terming! side first) REPLACE SENSOR; Fig. 5,6, 7 1. Remote COVER SCREW {1} and it COVER (18] off, 2. Disconnect SENSOR CABLES {8) and (7) from the BATTERY and SOLENOID VALVE. (Fig. 7) 8.
f¥F CHANGE SENSOR RANGE; 1. Remove the COVER BOWER 1) &. Novocaine the COVER (158 4. Disconnect the BLACK POWER SUPPLY CONNECTOR () and receptionist. Flg. £ 4. While the SENSOR CONTROL LED {8} s blini dag slowly, place your and In front of the sensor 5. When the LED stops blinking and stays “ON; move your hand o the desired position:and hold in place until the LED begins 1o blink against, §. Nee the SENSOR CONTROL LED ) begins unblinking, remove your handmaid from thi detection dona.