
Installation Guide


5
M965754 (9/16)
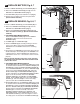
CAUTION: Use only American Standard supplied
transformers and cable sets. Using non-AS supplied
cables, or cutting, splicing or modifying any components
will void the warranty.
B
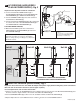
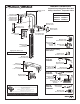
AC VERSIONS (HARD-WIRED /
PLUG-IN POWER SUPPLY); Fig. 2
Important: Turn off power to outlet or control box.
1. Connect PLUG-IN AC POWER SUPPLY (5) or
10' EXTENSION CABLE (2) if using HARD-WIRED AC
TRANSFORMER (7) to SINGLE AC ADAPTER (3).
2. Connect SENSOR CABLE (4) to the other terminal of
the SINGLE AC ADAPTER (3).
3. Connect PLUG-IN AC POWER SUPPLY (5) to wall outlet,
or connect other end of 10' EXTENSION CABLE (2) to
the HARD-WIRED AC TRANSFORMER (7).
FOR HARD-WIRED VERSION;
4. Make Black and White power line connections to
HARD-WIRED AC TRANSFORMER (7) and mount
into CONTROL BOX (6).
WALL
OUTLET
4" CONTROL BOX
OR EQUIVALENT BY
OTHERS (6)
Fig. 2
3
4
1
5
BLACK & WHITE
POWER
CONNECTIONS
10' EXTENSION
7
CONNECTOR NOT
USED IN THIS
INSTALLATION
7
6
2
Unit #1
(Already Installed)
Fig. 3
Unit #2 Unit #3 Unit #4
1
2
4
3
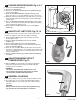
MAXIMUM OF 15 UNITS PER TRANSFORMER.
10' MAXIMUM CABLE LENGTH BETWEEN UNITS.
BLACK & WHITE
POWER
CONNECTIONS
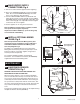
C
MULTI-AC VERSION (DAISY-CHAIN); Fig. 3
Important: Disconnect the rst unit’s Multi-AC Adapter from power supply before making daisy-chain connections.
Note: For Unit #1 electrical instructions, refer to Figure 2 (above).
For subsequent Units, refer to instructions below...
1. Connect one end of the 10' EXTENSION (1) to the available terminal of the previous unit’s MULTI-AC ADAPTER (2), and
the other end to the single terminal of the current unit’s MULTI-AC ADAPTER (3).
2. Connect SENSOR CABLE (4) to either of the two available terminals of MULTI-AC ADAPTER (3).
3. Repeat Steps above for each additional Unit, for a Max. of 15 Units on one AC POWER SUPPLY.
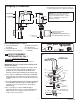
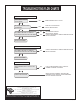
Recommended Control Box or Equivalent
by others
4" (102 mm) SQ. x 3-1/2" (89 mm) DEEP
ELECTRICAL BOX Hubbel-RACO #256
OR EQUAL (BY CONTRACTOR).