
Installation Guide


740209-100 (9/18)
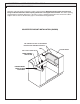
5a
APPLY SEALANT
- 5 -
4b
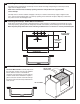
Installing Countertop - Countertop Mount Installation (Continued)
Carefully position and install the countertop over the cabinet ensuring sink opening in countertop correctly
aligns over the Support Frame.
Note: Place sink back into countertop opening and check sink position over support frame
and countertop.
Carefully remove sink from cabinet and apply a thin layer of sealant around the top edge of support frame.
(ref 3, step 2) and around top edge of counter top opening. Place sink back into place. Wipe any sealant that
may come out from around edge of sink.
For Under Mount Sinks: Carefully wipe clean
the sink apron and top rim free from all debris.
Ensure that the surface on underside of
countertop cutout opening is smooth and free
of debris. Under mount installation requires a
generous bead of sealant around the sink top
rim where sink and countertop underside will
make contact.
5
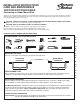
Installing Countertop - Under Mount Installation
ACTUAL SINK
DIMENSIONS
COUNTERTOP
CUTOUT DIMENSION
COUNTERTOP
CUTOUT
DIMENSION
Under mount countertop opening is determined by the cutout template or sink being used. Carefully cut out the
countertop opening, opening must be adequately finished and sealed to prevent damage from water absorption.
Note:
Physically verify dimensions of the sink being installed to use as a reference or use the provided templet.
TOP OF CABINET
APPLY SEALANT
ON TOP THREE
SIDES OF RIM