
Installation Guide


4
770278-100 Rev. 1 05/2020
a) Apply a bead of caulk or adhesive around all 4 sides of the top edge of the
vanity where the sink will sit. Refer to Illustration.
b) Place the sink onto the vanity and carefully over the trap assembly ensuring
sink sits evenly (left to right) over the vanity and against the rear wall.
See Illustration.
c) Clean up any adhesive that may run out.
d) Connect hot and cold supply lines between the tting valve and the supply
shut-off valves.
e) Connect the trap to the drain assembly and hand-tighten to check alignment.
It may be necessary to cut off part of the tailpiece (see detail B) or part of the
horizontal leg of the trap (see detail C). See Illustration.
f) Tighten trap joints for watertight assembly.
Sink To Vanity Installation
9
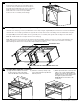
Remove all components from packaging, leg assembly and top plate. Screw
top plate to leg assembly using supplied screws.
Lay vanity on its back side on the oor and note pre-drilled hole locations on
the bottom/underside of the vanity.
Take leg assembly and line up holes in top plate with holes in vanity and screw
leg assembly to vanity with supplied M6 pan head screws. 4 screws required
for each leg assembly. Each individual leg can be adjusted for height (up or
down) by turning bottom feet clockwise or counterclockwise.
Installing Optional Legs on a Single Vanity
10
If installing optional bridge to vanities, follow STEP 11: Connecting Optional Bridge to Vanities.
B
C
LEG
ASSEMBLY
TOP PLATE
PRE-DRILLED
HOLE LOCATIONS
SCREW
LOCATIONS