
Installation Guide


- 2 -
M985008 (2/19)
1
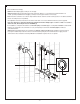
• Remove Old Shower Arm (1).
• STEP 1a Install adapter (3) by screwing it onto the pipe.
Optional: Adapter (3) must protrude from the wall a minimum distance of 1" (25 mm) and a maximum distance of
2-5/16" (58 mm). Install Extension Nut (5) by screwing it onto the pipe if extension is necessary.
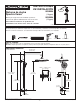
• Mark the bottom center line. Use a level to help mark the vertical center line for the mounting location. The distance between
the two mounting holes is 24" (610mm).
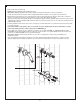
• The adjustable shower bar works best if secured to a wall stud or cross brace within the wall using screws supplied.
Note: This dimension is important and must be maintained. If Bottom Adapter (4) is secured to a stud or cross brace
with in the wall, drill small pilot holes for SCREWS (2).
• For installations on drywall or tiled walls: Use ANCHORS (2A) and SCREWS (2) for securing ESCUTCHEON to nished wall.
Drill two 1/4" (6 mm) dia. holes a minimum of 1-3/4" (44 mm) deep. Insert the two ANCHORS (2A) flush with face
of the nished wall.
Optional: Bottom Adapter May also be installed using DOUBLE SIDED TAPE (6) (already installed on the back surface).
For proper installation wipe clean the surface. Peel off the backing and place it at a desired location. Apply pressure
and hold it for 30 seconds before releasing it. Note: This installation requires 24 hours of dry wall.
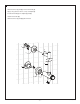
INSTALL WALL ANCHORS
5
3
2
3
4
1
5
2
3
2
4
6
6
2
1
4
3
2A
4
2
24"
(610 mm)
1A1
5
Center
Line
Center
Line
6