
Use and Care Manual


7302365-100
3
B
C
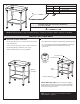
Wall Preparation for Washstand Installation
Provide suitable reinforcement behind nished wall for
Washstand mounting screws.
Note: If replacing an existing sink be certain to shut off
water supply prior to removing old sink.
Town Square S Washstand Preparation
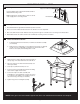
1. Place Washstand into approximate installation position near wall.
2. Place a level on the Washstand and check in two directions. Feet are adjustable.
3. Once level, drill at least two 3/8" diameter anchoring holes through the centerline of the rear stringer of the Washstand.
4. Attach Washstand to the reinforcement in the wall with 3/8" mounting screws not included.
C/L of 2 x 6
Support and Bracket
Finished Floor
32"
(813mm)
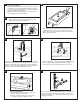
WASHSTAND INSTALLATION
1
2
3
4
1. Following manufacturer’s instructions, install faucet and drain assembly
(not included).
2. Apply a bead of sealing putty on the underside of the drain (see detail A)
in order to ensure a watertight seal between the sink and the drain.
Remove excess putty after installing drain on sink.
Faucet and Drain Installation
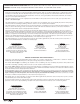
1. Apply a bead of caulk or adhesive around all 4 sides of
the top edge of the washstand where the sink will sit.
2. Place the sink onto the washstand and carefully over
the trap assembly.
3. Clean up any adhesive that may run out.
4. Connect hot and cold supply lines between the tting
valve and the supply shut-off valves.
5. Connect the trap to the drain assembly and
hand-tighten to check alignment. It may be necessary
to cut off part of the tailpiece (see detail B) or part of
the horizontal leg of the trap (see detail C).
6. Tighten trap joints for watertight assembly.
Sink to Washstand Installation
A
NOTE: Place glass shelf onto wooden support shelf once sink and Washstand installation are complete.
Caulk or Adhesive