
Instructions / Assembly


2 x 4"
(51 x 102mm)
Stud Wall
Bedding
Material Area
5" (127mm)
2" (51mm)
PVC Pipe
3-1/4"
(82mm)
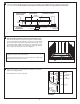
BEDDING MATERIAL
SUPPORTS
SHOWER BASE
NO BEDDING
MATERIAL UNDER
BASE FLANGE
CROSS SECTION OF
SHOWER BASE
ROUND SHOWER
STRAINER TYPE DRAIN
3
FIGURE D
FIGURE E
FIGURE C
Mix a non-shrinking bedding material such as mortar and apply enough bedding material to support the entire bottom of
the shower base. Concrete is NOT recommended. The shower base is NOT to be supported by the base flange.
755467-100 Rev. 2 10/19
Level base in two directions.
Note: Allow the bedding material to completely harden before applying
weight to the bottom of the shower base.
Place strainer back into place and conduct a water test of drain and
plumbing to ensure there are no leaks.
4
After the bedding material has been poured and before it sets,
lower the shower base into position with the drain assembly sliding
over the waste pipe (Fig. C). It will be necessary to "rock" the shower
base until the top of the tile flange aligns with the lines drawn on the
stud walls from Step 1. Make sure the apron is contacting the rough
floor along the entire length of the shower base and ensure that the
base is level in two directions as shown in Figure D.
Tape over the strainer to protect the finish and prevent construction
debris from entering the drain.
Finish installation as shown in Figure E.
Level
Level
3
5
Shower
Base
Tile
Adhesive
Waterproof
Drywall
Tile
Stud
Caulk