
Installation Sheet

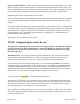


EXTERIOR
SNAP-IN
FILLERS
HEADER
CURB
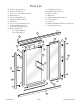
10 Orient the door [K] to the opening. Grab the door
from the inside. The open side of the hinge jamb [K1] should
be away from you. (see illustration) Carefully lift the door
into the opening and slide the hinge jamb completely over
the available wall jamb.
Holding the door in the open position;
1. Check the curb and header length
2. Trim if necessary
3. press the curb snap-in filler [L] into the curb, WITH THE
RAISED LIP ON THE EXTERIOR. Slide the snap-in filler
against the stationary panel. Press the header snap-in filler**
[M] into the header WITH THE FLANGE ON THE
INTERIOR. (see illustration)
** Prior to installation, be sure that the magnet [N] and vinyl [G] are inserted into the flange. The open part
of the vinyl should be facing down and the magnet should be on the side closest to the stationary panel.
EXTERIOR
11 Adjust the door using the overlap of the
hinge jamb over the wall jamb and the stationary
panel into the other wall jamb. Plumb the door as
best as possible ensuring that there is an even gap
between the bottom of the door glass and the
bottom snap-in filler.
Be sure that the stationary panel is inside the wall
jamb by a minimum of 1/4”, the hinge jamb overlaps
the wall jamb by a minimum of 5/16” and the snap-in
fillers are tight against the hinge jamb and the exposed
glass edge of the stationary panel.
From the inside of the enclosure, mark the location of
the hinge jamb on the wall jamb with a pencil at the top
and bottom once the door has be properly adjusted.
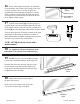
12 Verify that the door has not shifted using the pencil
marks. Then, from the inside of the enclosure, drill two
1/8” holes through the hinge jamb and into the wall jamb
approximately 1” from the ends of the jambs at the top
and bottom and 3/16” from the edge of the open side of
the hinge jamb. (see illustration)
Drill a third hole in the middle of the jamb in line with
the first two and centered between them. Be sure that the
drill bit does not go through the front of the enclosure.
Carefully, enlarge the three holes in the hinge jamb only
with a 3/16” drill bit for clearance of the truss head screws.
CAREFUL: DO NOT enlarge the holes in the wall jamb.
Attach the hinge jamb permanently with three #8 x 1/4”
truss head screws.
VINYL
WALL
JAMB
1“
1”
DOOR
PANEL
ASSEMBLY
HEADER
3/16”
HINGE
JAMB
DOOR
PANEL
SNAP-IN
FILLER
WALL
JAMB
CURB
PENCIL
MARK
HEADER
PENCIL
MARK
WALL
JAMB
R
O
I
R
E
T
X
E
R
O
I
R
ET
X
E
QCI5239 Rev 0 Page 7 Certified 06/20/2016